Using Your Wallet
Setup Your Wallet
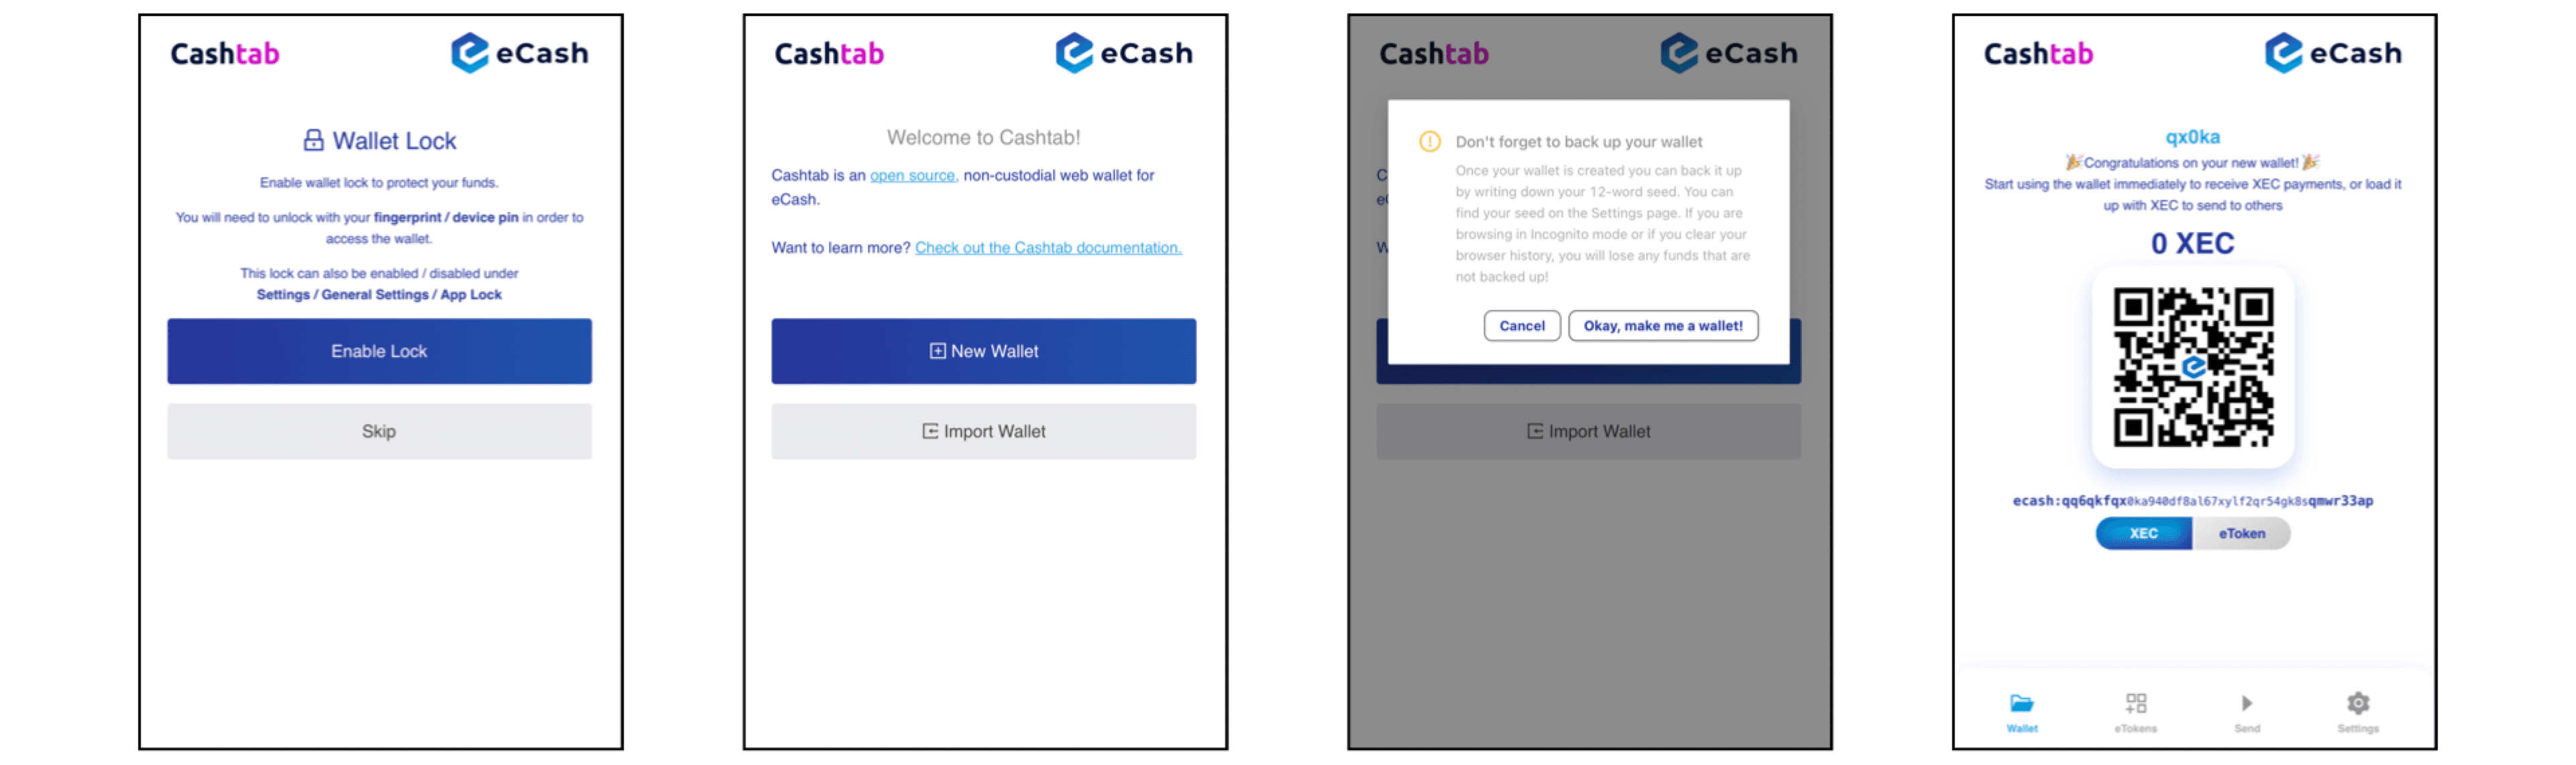
Visit https://wallet.badger.cash to setup your wallet.
- Click Enable Lock to enable access control or skip
- Click New Wallet to create a new wallet
- NOTE: You will backup your wallet in later steps
- Your new wallet is now ready to receive BUX
image
Backup Your Wallet
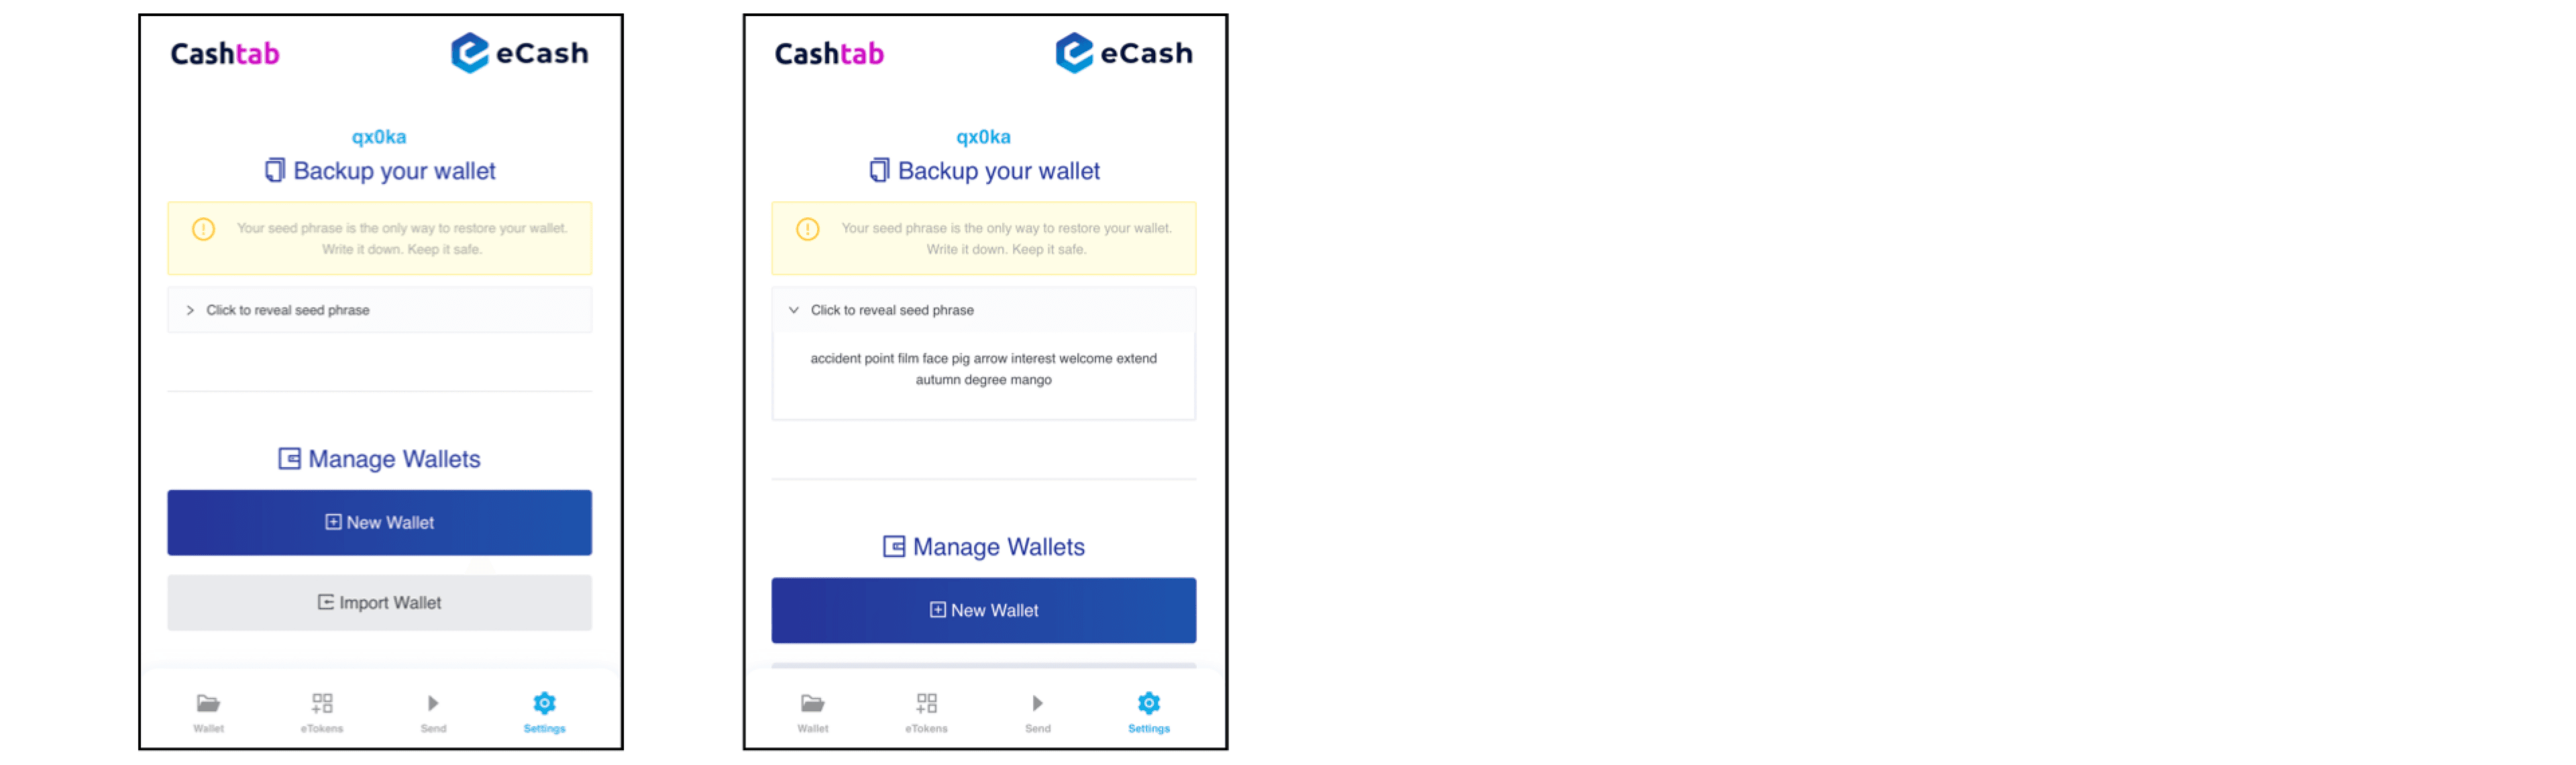
Your seed phrase is the only way to restore your wallet. Write it down. Keep it safe. No one else is able to restore your wallet. Here is an overview on seed phrases and recommendations for safe storage: https://www.coinbase.com/learn/crypto-basics/what-is-a-seed-phrase
- Click Settings to access your wallet settings
- Click Click to review seed phrase to display your seed phrase
Provide Your Address
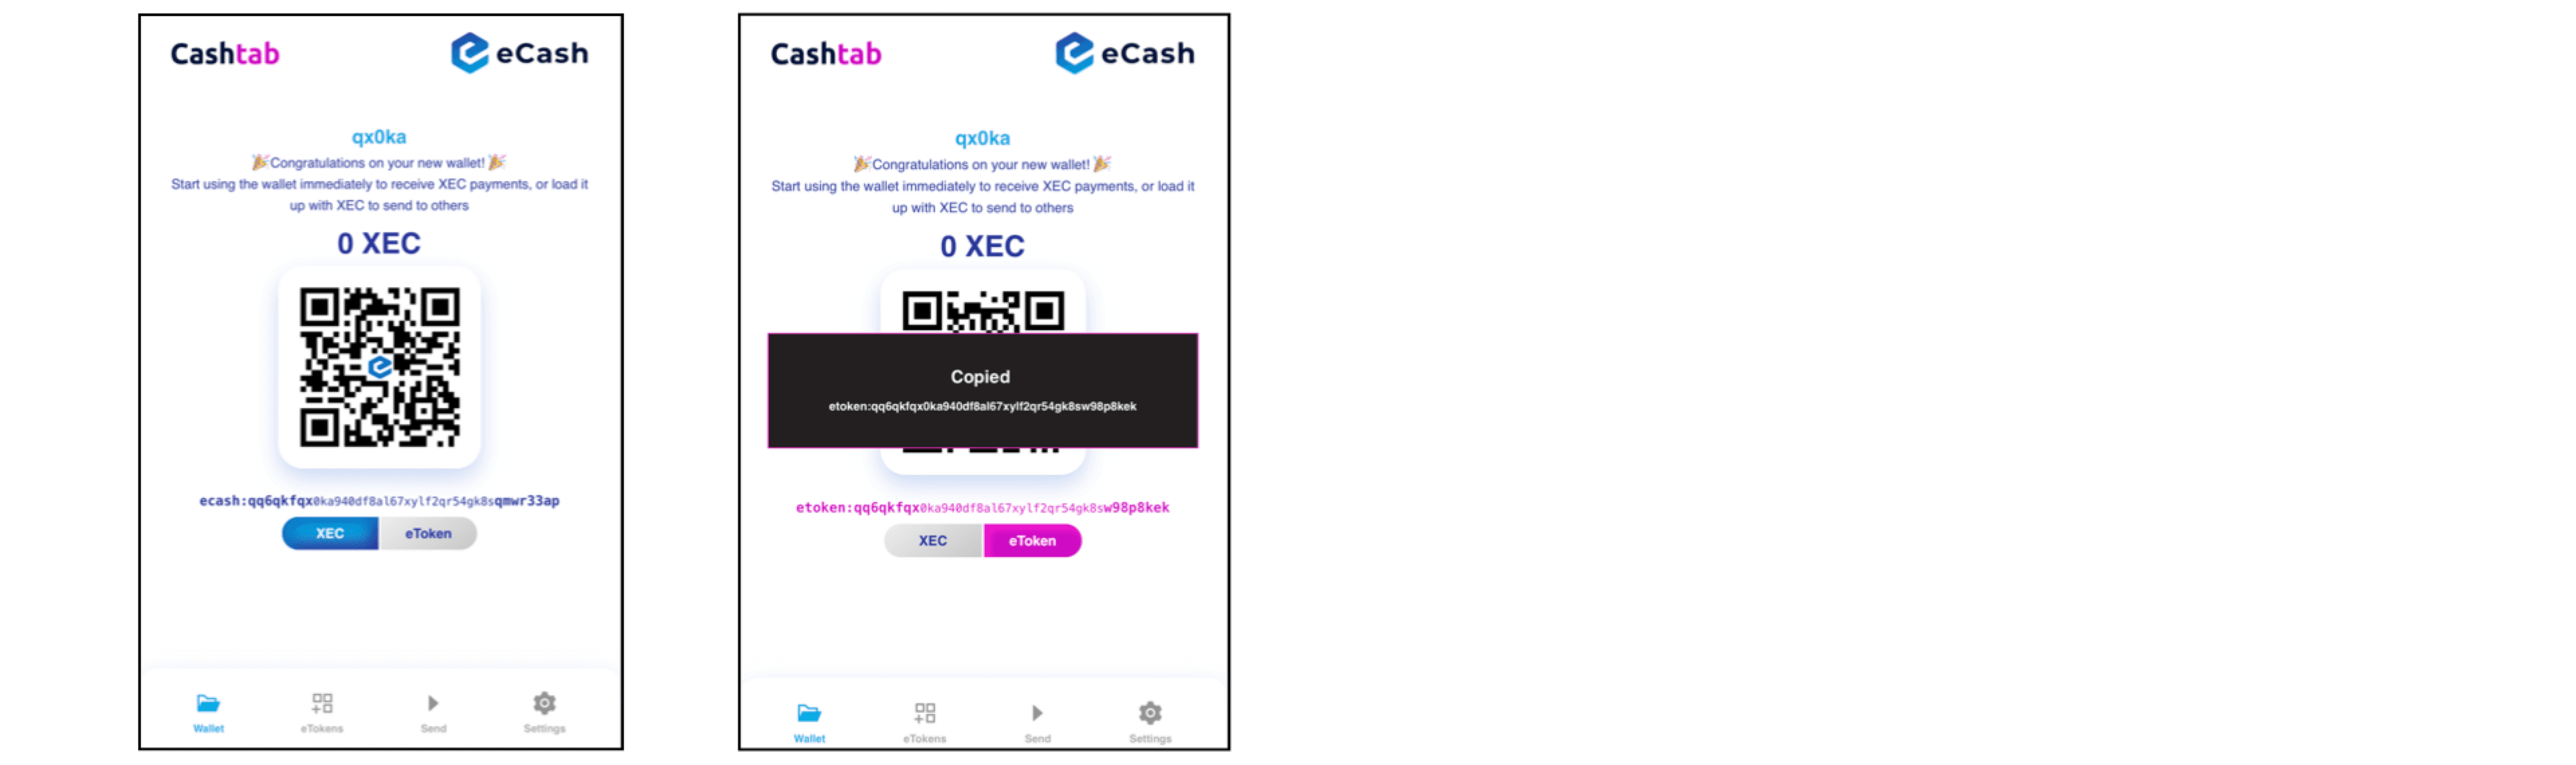
Your wallet address provides the details for other people to send you BUX, similar to your email address. Your address is safe to share as it does not provide access to your wallet. You will need to provide your wallet address to be included in a ICP API request.
- Click Wallet to display your wallet details
- Click XEC, then your ecash address to copy
NOTE: While wallet addresses with both the ecash or etoken prefix will function interchangeably in a ICP API request, for simplicity using ecash is recommended.
Manage Multiple Wallets
You can easily have multiple, separate wallets.
- Click Settings then click New Wallet to create a new wallet
- Toggle Saved wallets to display all of your wallets
- Click the Edit icon to set a nickname for each wallet

Payment Solution Flow
- End User chooses relevant method or uses direct payment link
- Agent's server sends GET request containing the transaction details to ICP API
- ICP API returns
paymentUrlthat leads the End User to a non-custodial web wallet with prefilled transaction data - End User pays inside the wallet and, on success, is led to
success_url - Agent receives Instant Payment Notification (IPN) and validates the IPN before approving the purchase
End User Chooses Payment Option
Agents are able to flexibly utilize the ICP API solution to provide End Users with the relevant payment option. For example, this can be done similar to legacy payment options (which can be maintained unchanged in parallel). Agents, affiliates, and others can also create direct payment links, such as buttons on a website or links in an email or text message. Agents are encouraged to inform End Users of the nature of this payment method.
Agent's Server Sends GET request
A GET request is made to https://test.icorepay.io/v1/. The query string must follow the exact syntax as specified in the documentation of the BUX.digital Merchant Server. Agents must gather wallet address(es) from Recipient(s), to which the distribution of BUX will be sent directly from the End User with every transaction.
ICP API Returns paymentUrl
The ICP API responds with the same syntax as specified in the BUX.digital documentation. The Agent can either make the GET request to the ICP API and receive the paymentUrl as part of a JSON response or, while not specifying the result_JSON parameter, let the End User make the GET request by opening the link in a browser.
End User Pays Inside Wallet
The End User will be redirected to a non-custodial web wallet, which will be newly opened if the End User did not previously create one using this browser session. As paymentUrl has been used, the related transaction data will be prefilled into the wallet. The End User, having an insufficient amount of BUX inside their wallet, will be directed to buy an authorization code to Self-Mint the eTokens directly inside the wallet. This purchase is done by conventional payment methods. After the succesful Self-Mint by the End User, the BUX eTokens can be used in order to settle the payment request. It is possible that the End User utilizes previously minted BUX.
Agent Receives IPN and Validates IPN
Following the successful fulfillment of a payment request, an IPN is sent to the URL specified in the ipn_url of the initial GET request. This request must be validated by the Agent. This differs severely from legacy payment methods as third parties between the transaction participants usually guarantee trustworthiness of IPNs. With an open, permissionless network, every participant needs to validate that transactions are as intended. Please consider the following properties of the IPN here.
First of all, the IP origin of the IPN should be validated as it must equal the origin of the paymentUrl (https://pay.badger.cash/). If validated, the IPN received could still indicate an unintended transaction as malicious actors on the network could potentially modify the transaction to their benefit. The recipient of the IPN must now compare intended transaction outputs with actual outputs. The IPN properties (custom/order_key for example) should help the merchant to identify the expected recipients and amounts for a still unfulfilled order. Actual transactions can be reviewed by requesting an eCash node with a transaction hash, as given in the txn_id of the IPN data. Nodes might already parse out SLP data and include it in the sent data (as below). If that is the case, Merchants do not have to validate if a transaction is a valid eToken transaction as the node has already done that. See the example below.
const axios = require('axios');
const buxDecimals = 4;
// partial ipn POST data
const ipn = {
   txn_id: "bbfc1da442c4cd5214f3eb72fd9113d12f8f0352cc74ac7948029e8adb40dda9"
};
// call to merchant database to get expected amounts and recipients based on `order_key`. (amount = 1 BUX = 10000 base units of BUX)
const expected = {
   amount: 1 * 10**buxDecimals,
   recipient: "ecash:qz92ejgtzd0wstr6qjjy6cef533635cxju8vuzeqye"
};
(async () => {
   // GET request to node
   const url = `https://ecash.badger.cash:8332/tx/${ipn.txn_id}?slp=true`;
   const result = await axios.get(url);
   const txData = result.data;
   // process node data to data format used for comparison
   const outputArray = txData.outputs.map(function(output) {
       return {
           amount: Number(output.slp?.value),
           recipient: output.address
       };
   });

   // compare arrays or normalize addresses before && normalize amounts
   const isIncluded = outputArray.some(output => output.amount === expected.amount && output.recipient === expected.recipient);
   console.log(isIncluded);
})();
Please consider the two possible address formats (ecash/etoken) when comparing. Nodes might only give you the address format with prefix ecash. One way to standardize addresses to one of the two formats is given below.
const ecashaddr = require('ecashaddrjs');

// function returns address with desired prefix
function convertAddress(address, targetPrefix) {
   const { prefix, type, hash } = ecashaddr.decode(address);
   if (prefix === targetPrefix) {
       return address;
   } else {
       const convertedAddress = ecashaddr.encode(targetPrefix, type, hash);
       return convertedAddress;
   }
};

const ecashAddress = convertAddress("etoken:qz92ejgtzd0wstr6qjjy6cef533635cxjufj4q08qw", "ecash");
Depending on the merchant’s risk of accepting false IPNs, it might also be very helpful to keep a list of transaction hashes already used for fulfilling orders so that old transactions could not be used again.