Launching your AMI
Once you have purchased our AMI from the marketplace you can follow this guide to setting up and launching our Admyn panel.
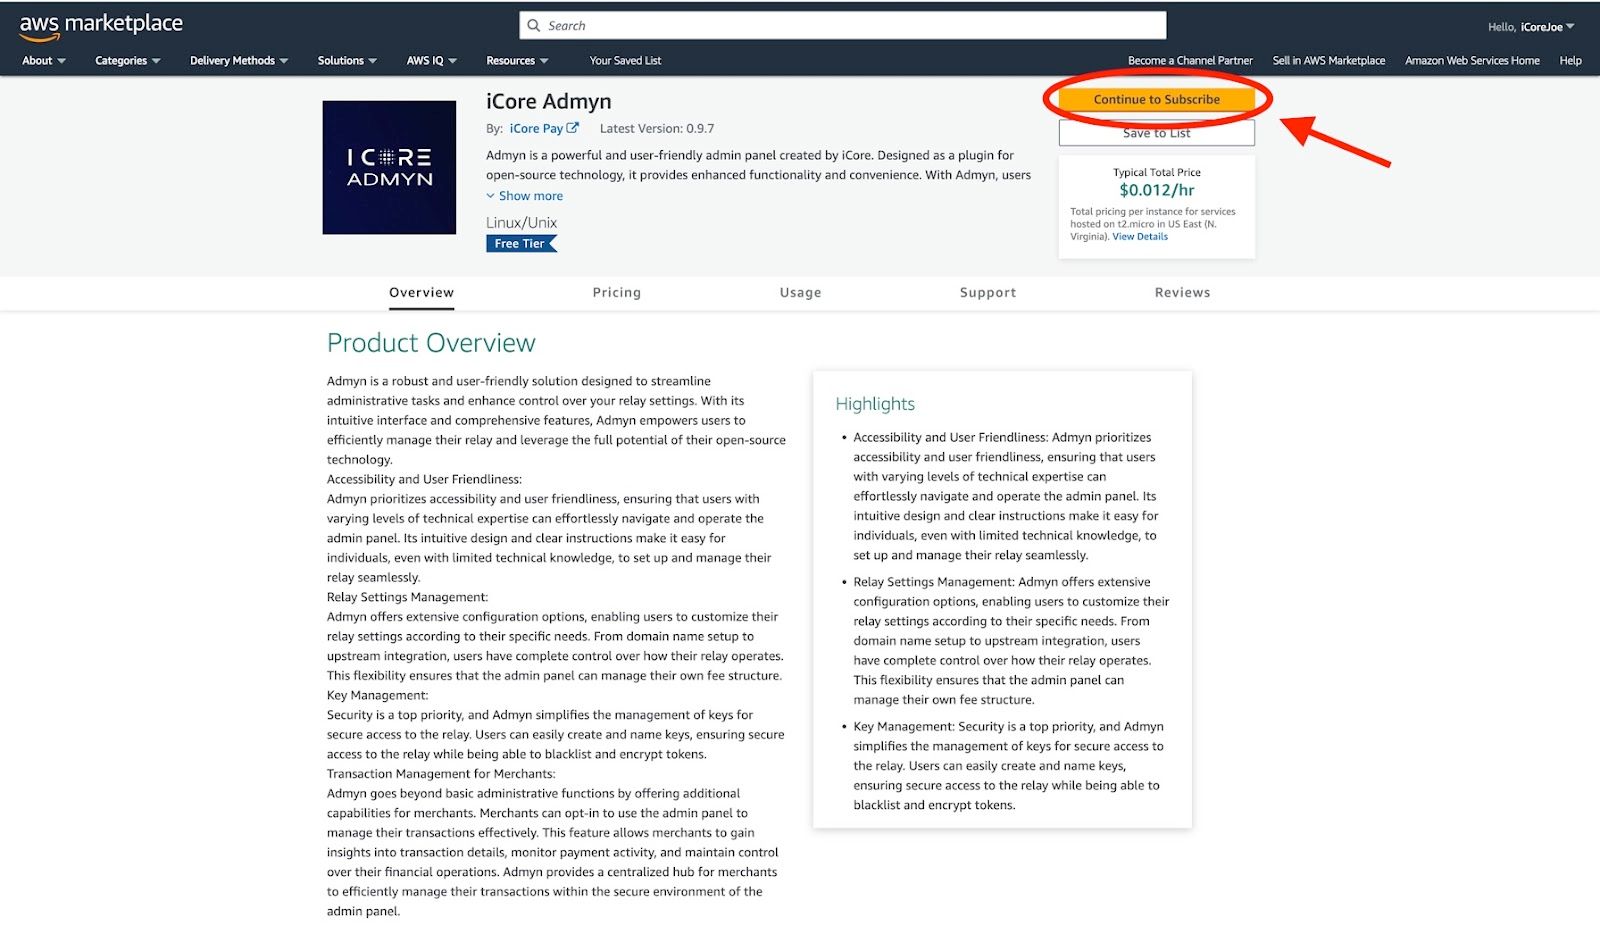
Step 1: Click on the subscription link
- Click to “Continue to Subscribe”
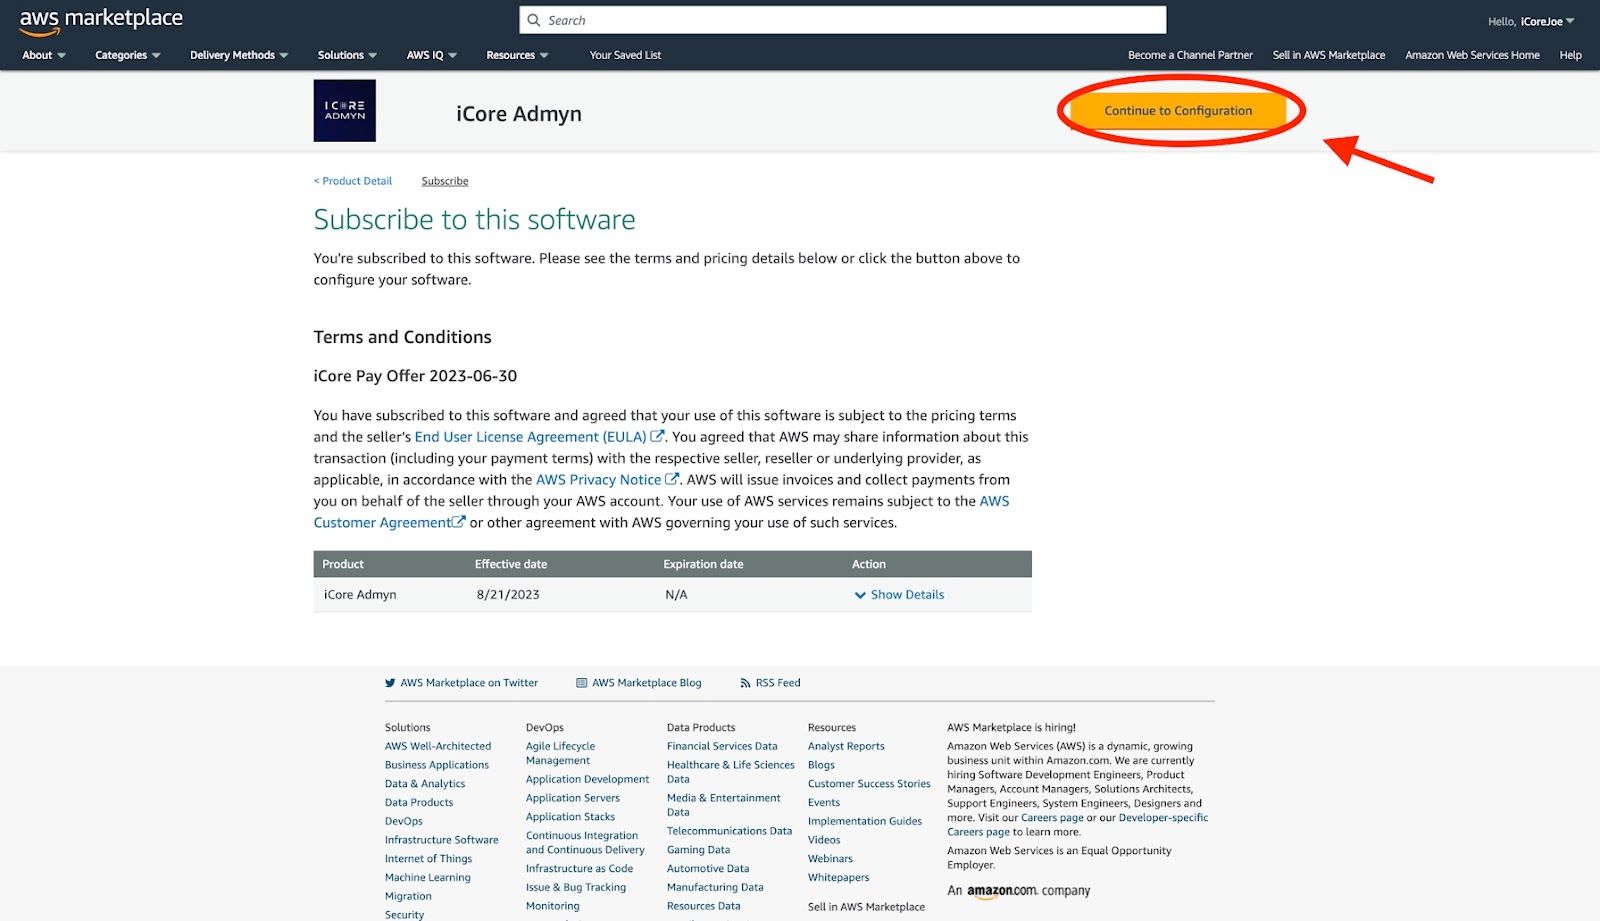
Step 2: Continue to Configuration
- Click the "Continue to Configuration" button (orange button)
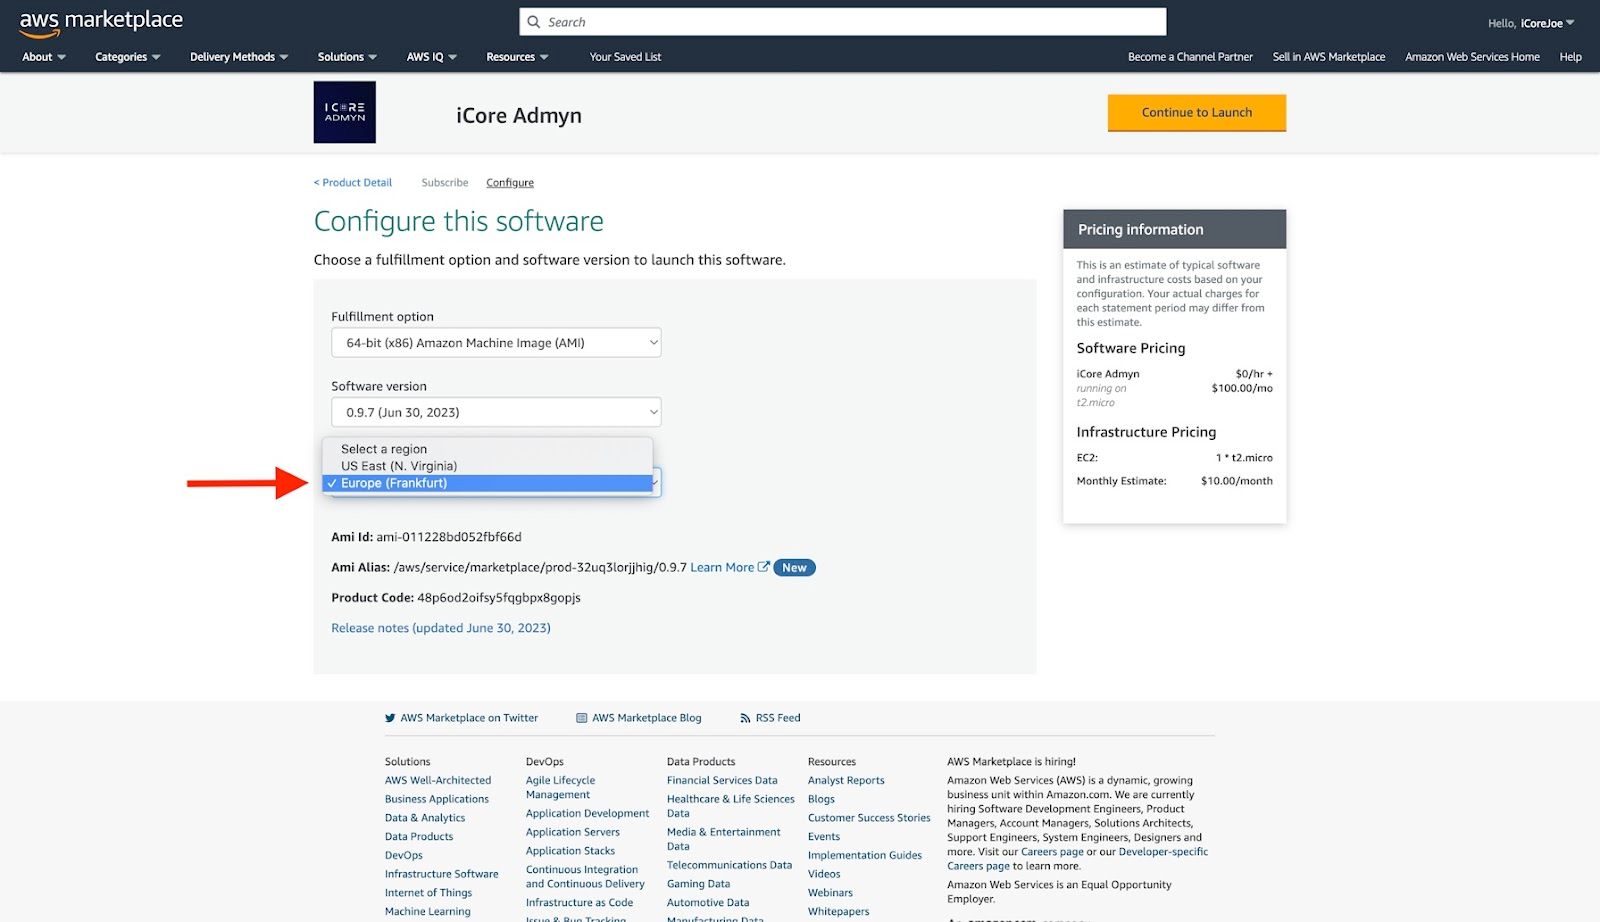
Step 3: Set your Region
- Configure your region (We recommend Europe)
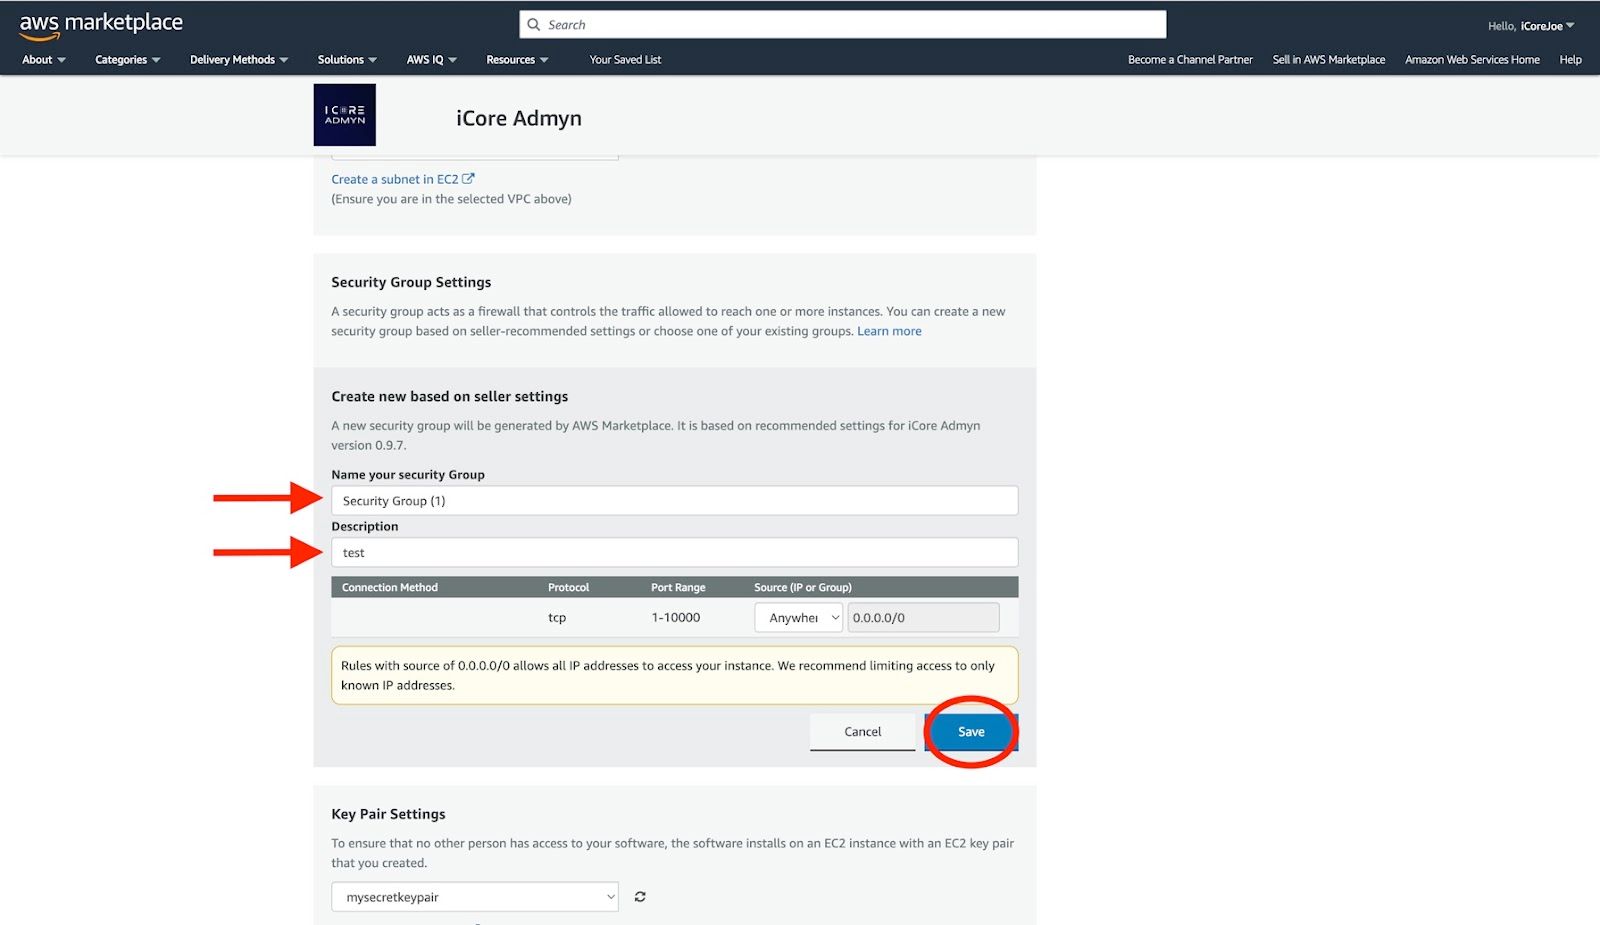
Step 4: Edit Security Group Name
- Click "Edit" in the "Network Settings" section.
- Scroll down to the "Security group name" field.
- Provide a name for the security group, following the recommended naming convention: relay name followed by "-security group".
Step 5: Create a new key pair
- Scroll down until you see the "Key Pair" section.
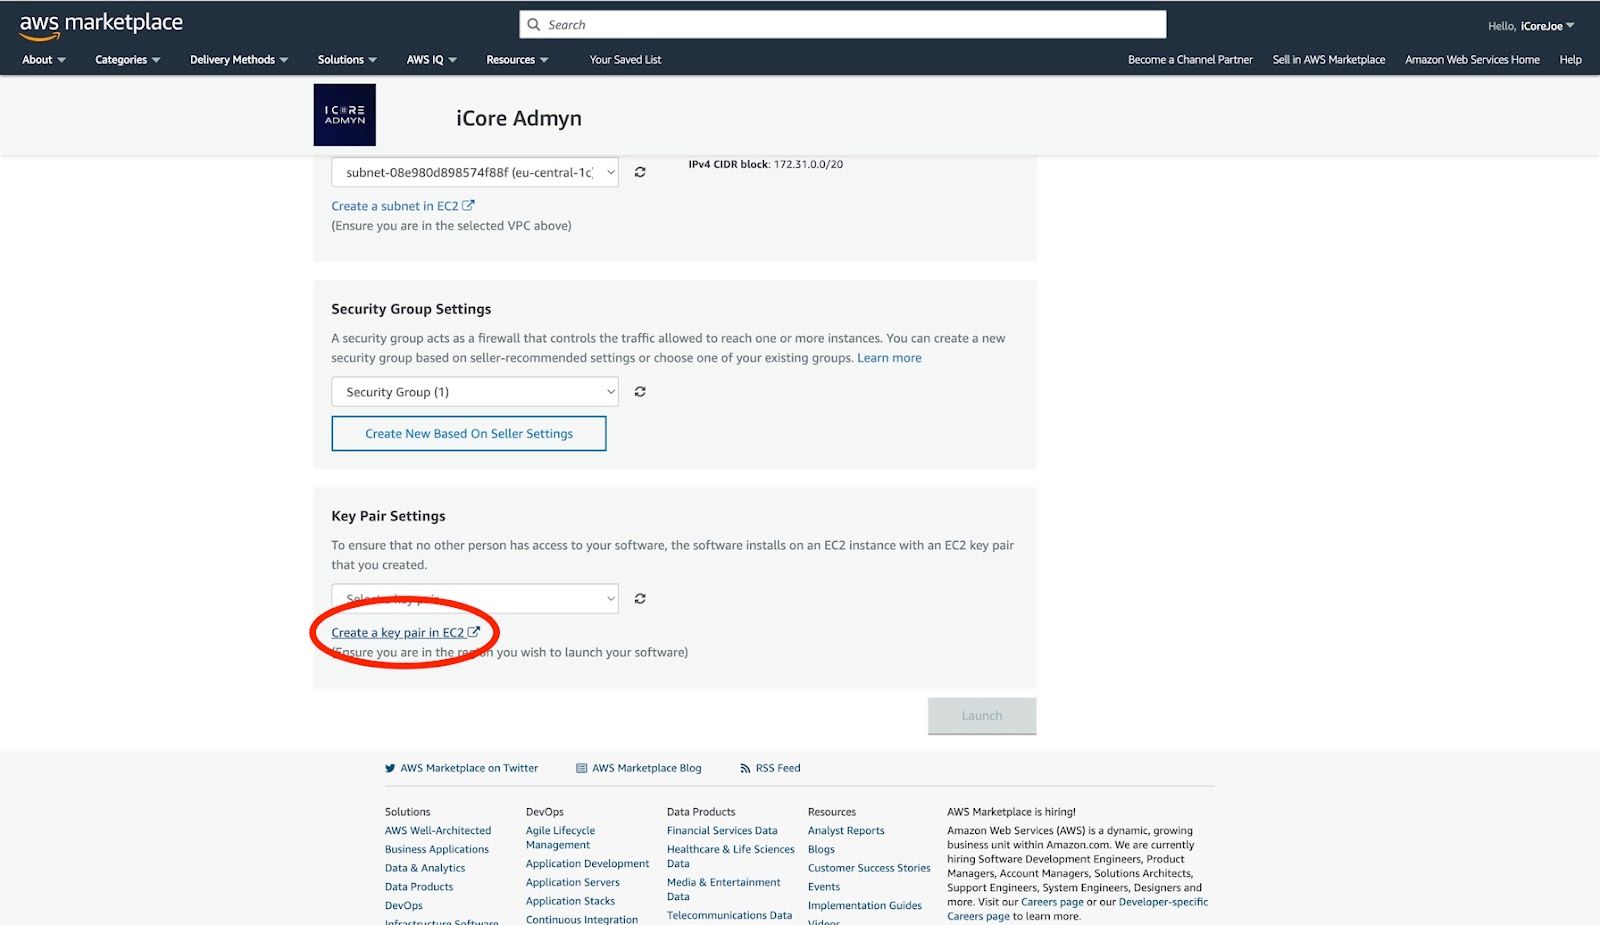
2. Click "Create new key pair".
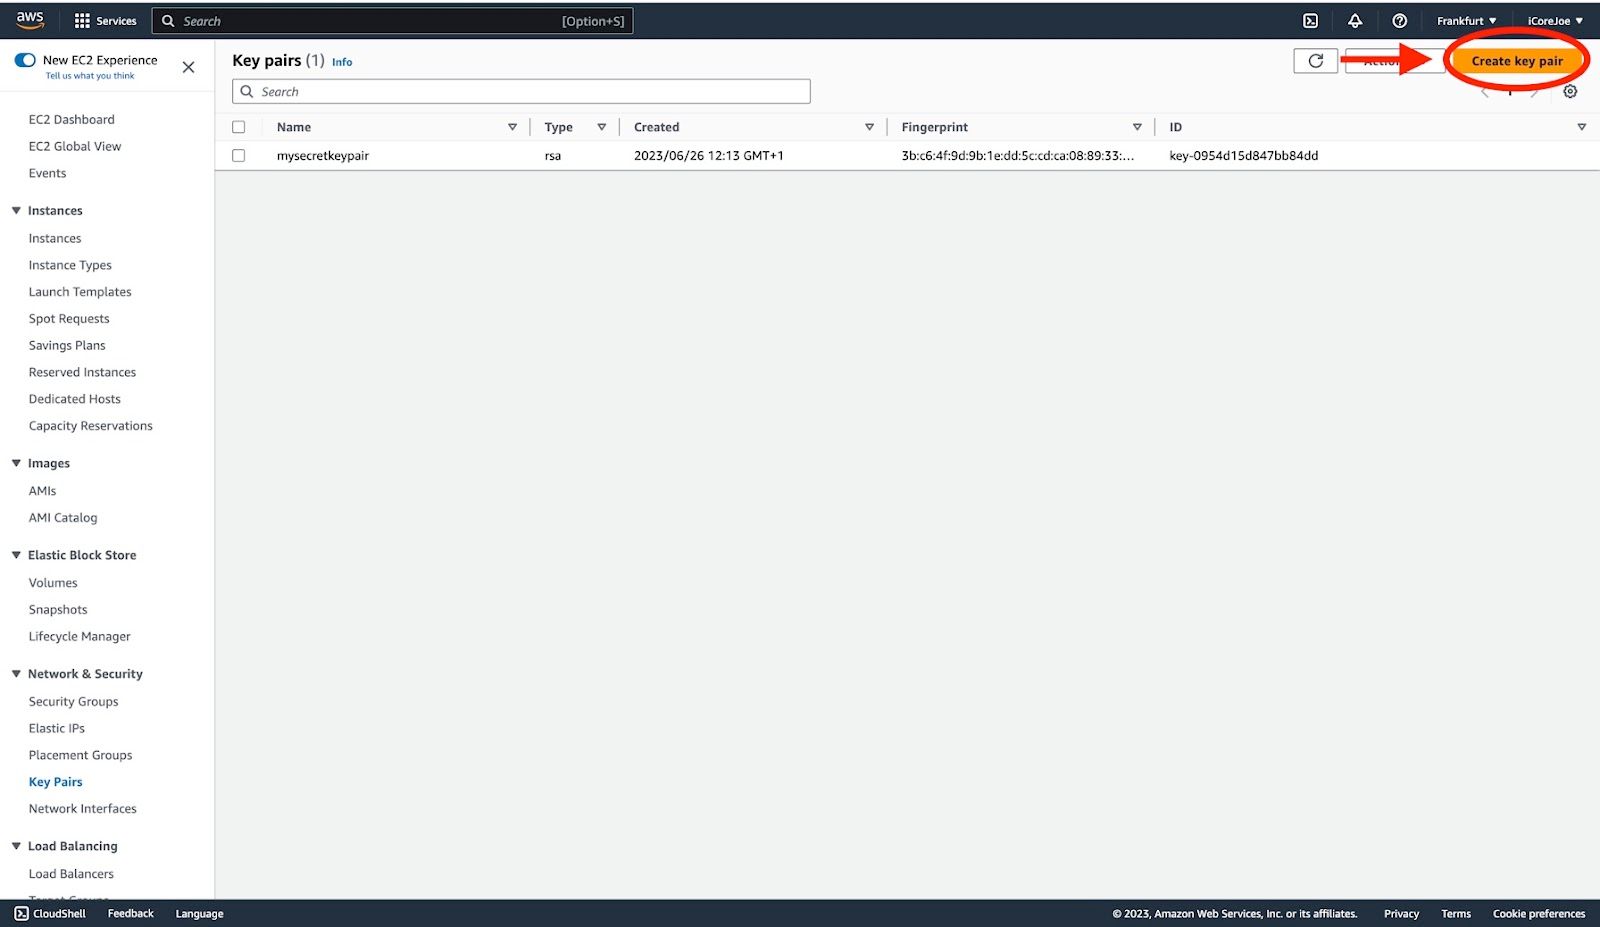
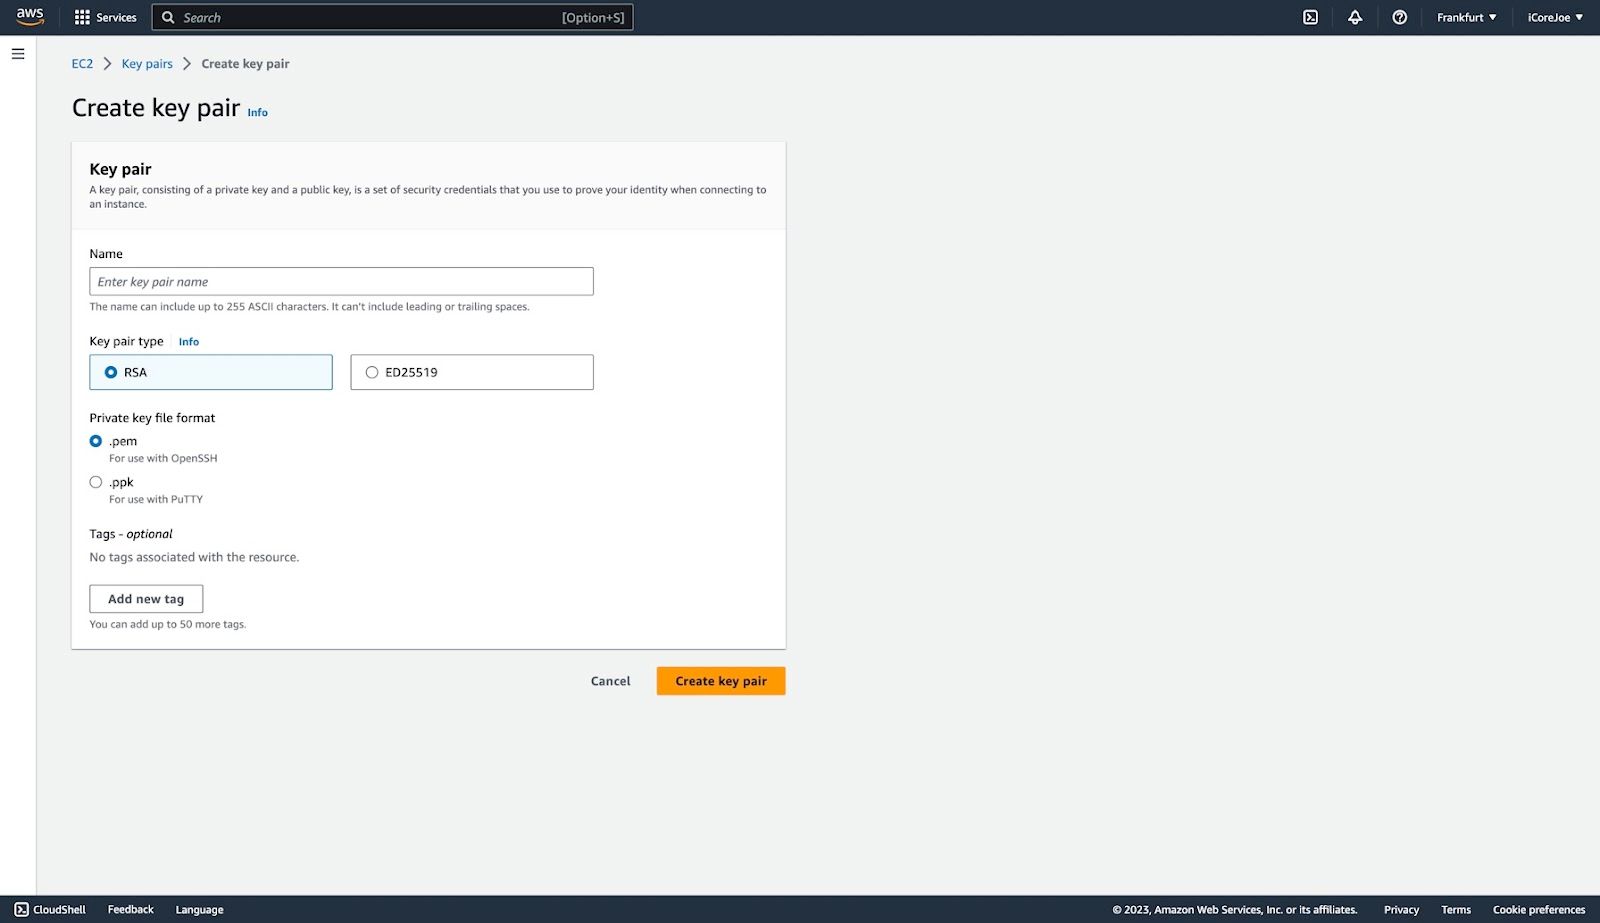
Step 6: Name the key pair
- Enter a name for the key pair.
**Note: Ensure it is something you will remember and keep it discreet as it grants access to the terminal. Make sure there are no spaces or capital letters in the name.
Step 7: Create the key pair
- Click "Create key pair".
- Save your key pair in a secure location, you may need to use it later if manual connection is required. ( Click Here for more information )
**Note: Please do not leave it available on any public devices.
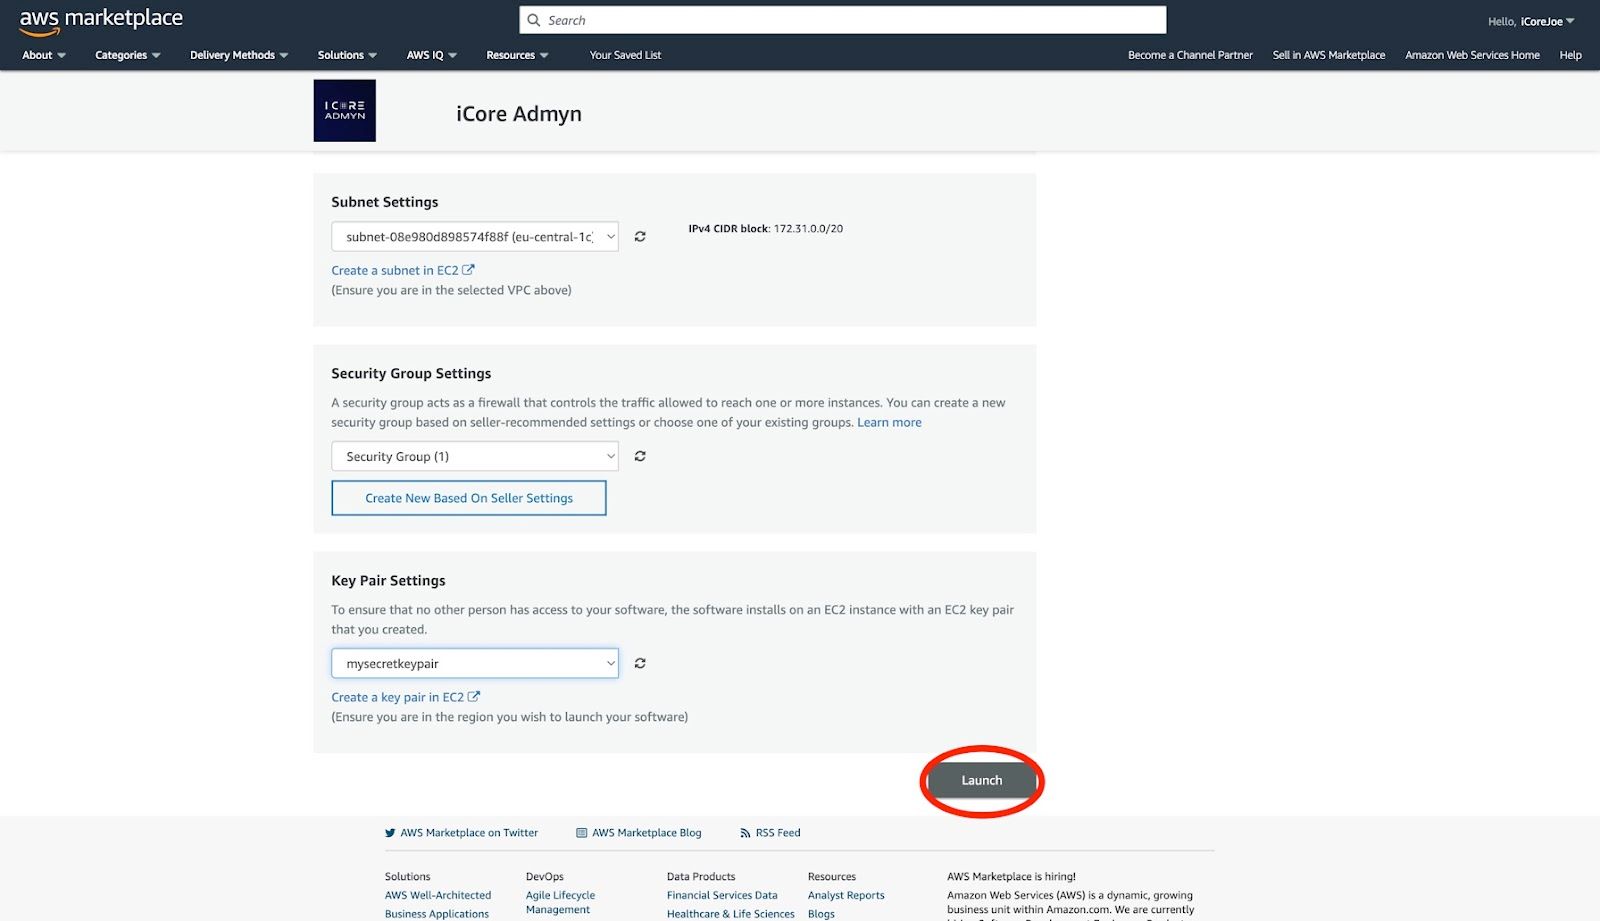
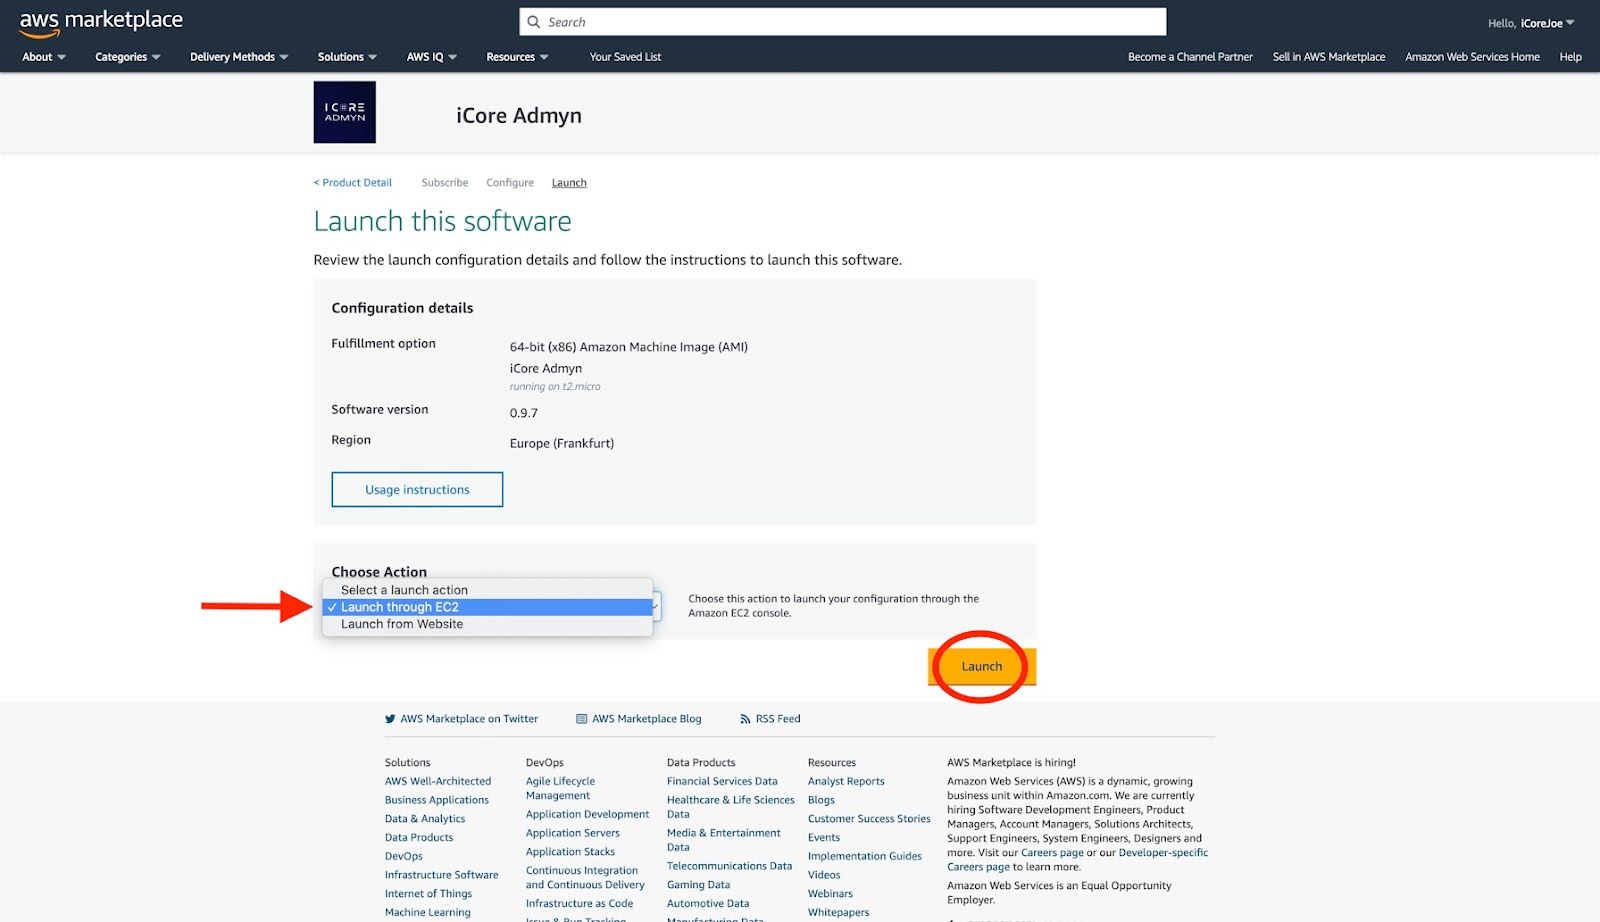
Step 8: Launch the instance
- Click "Launch Instance".
2. Select “Launch from EC2”
3. Click "Launch Instance".
Step 9: Success
Congratulations! You have successfully launched your instance.
Configuring Security Groups
To allow operators to whitelist IP addresses for panel access, follow these steps to configure the security groups.
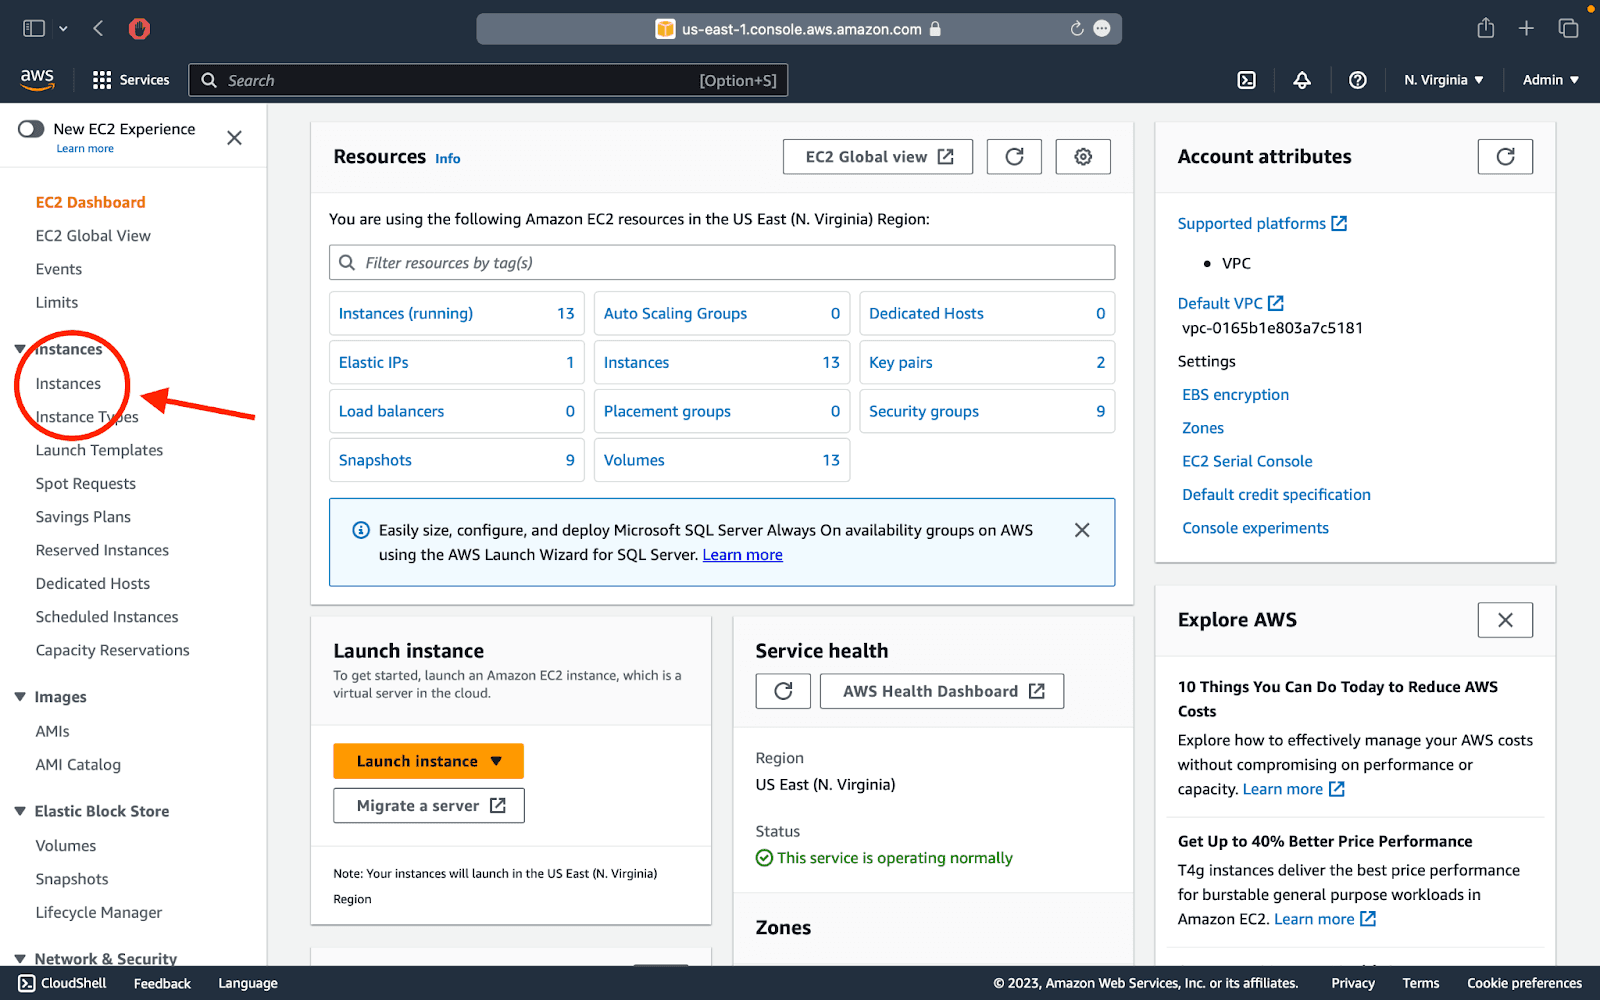
Step 1: Access Instance Details
- Go to the "Instances" page.

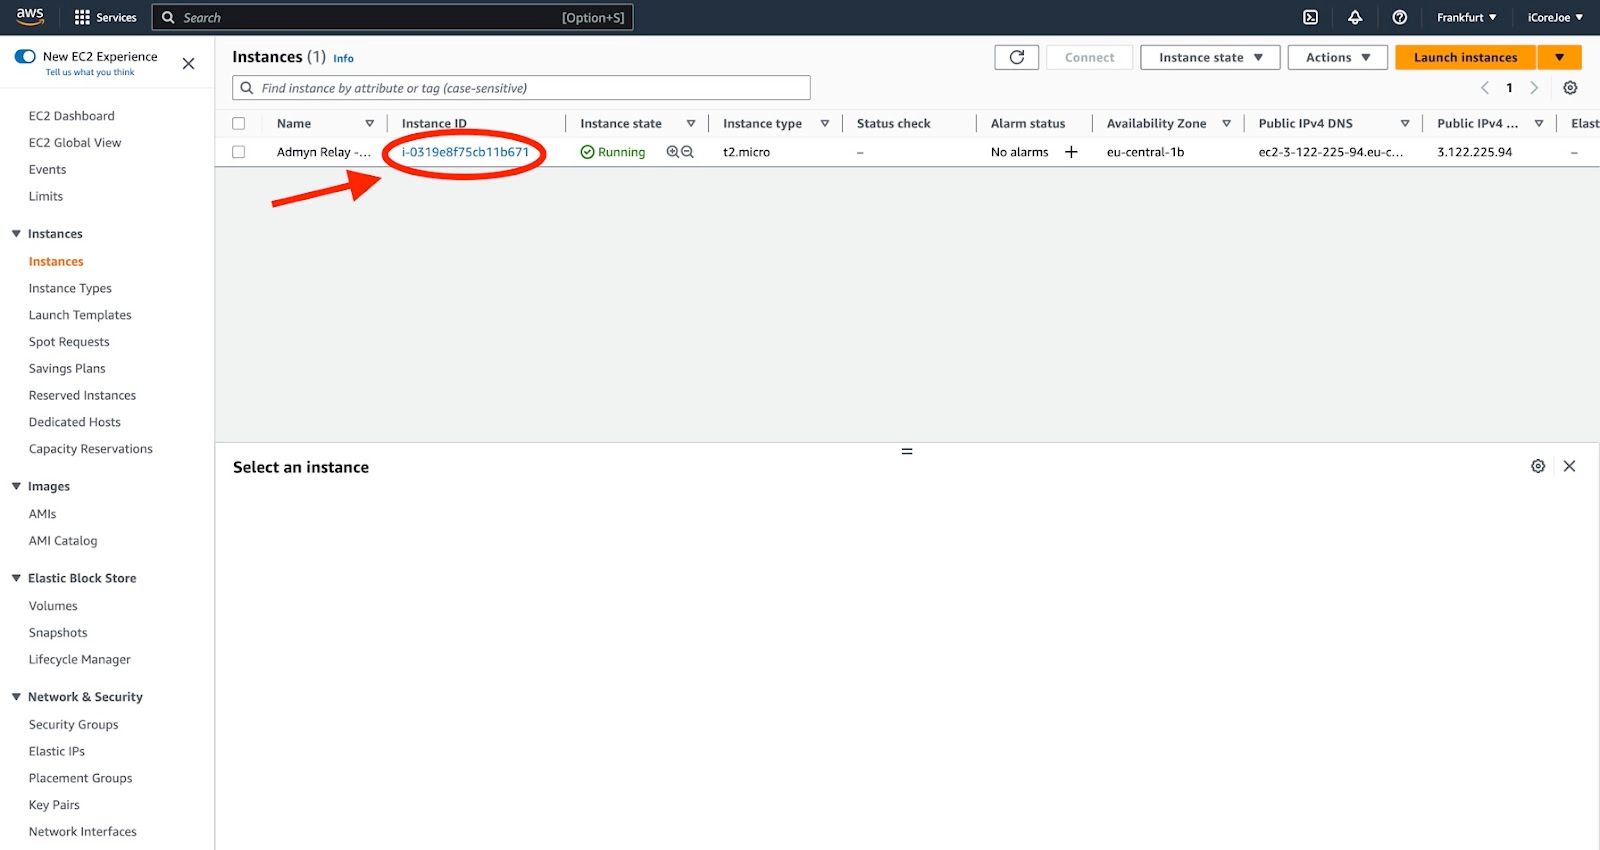
Step 2: Go to Instance ID
- Click on the "Instance ID" of the previously created instance.

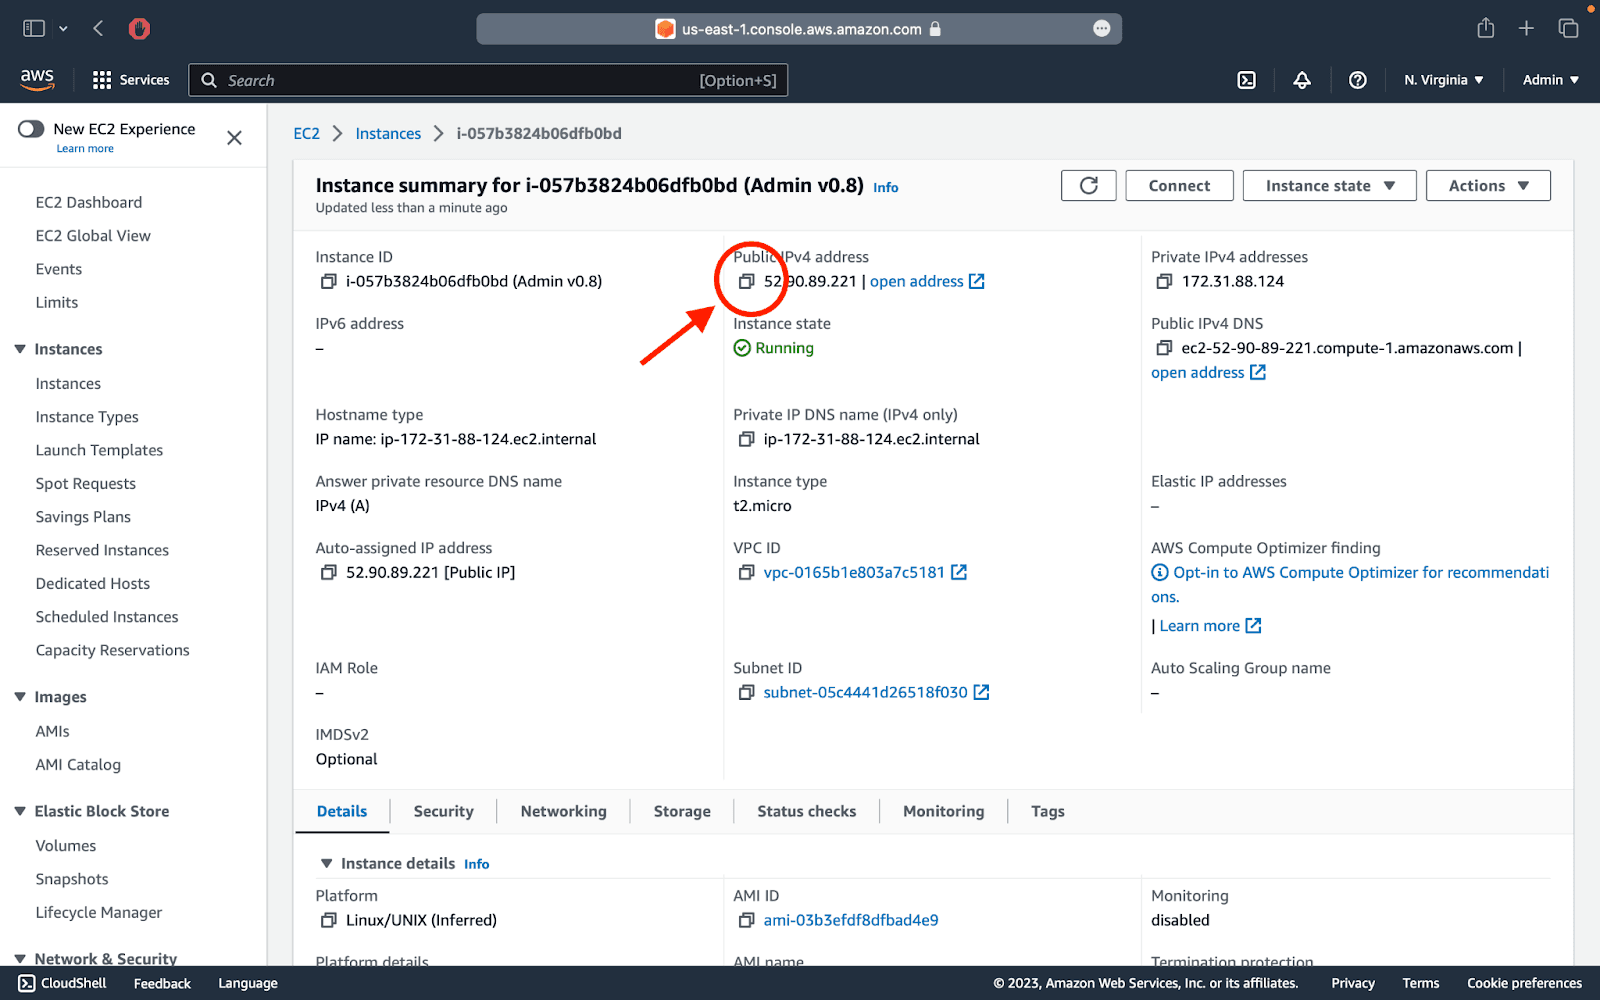
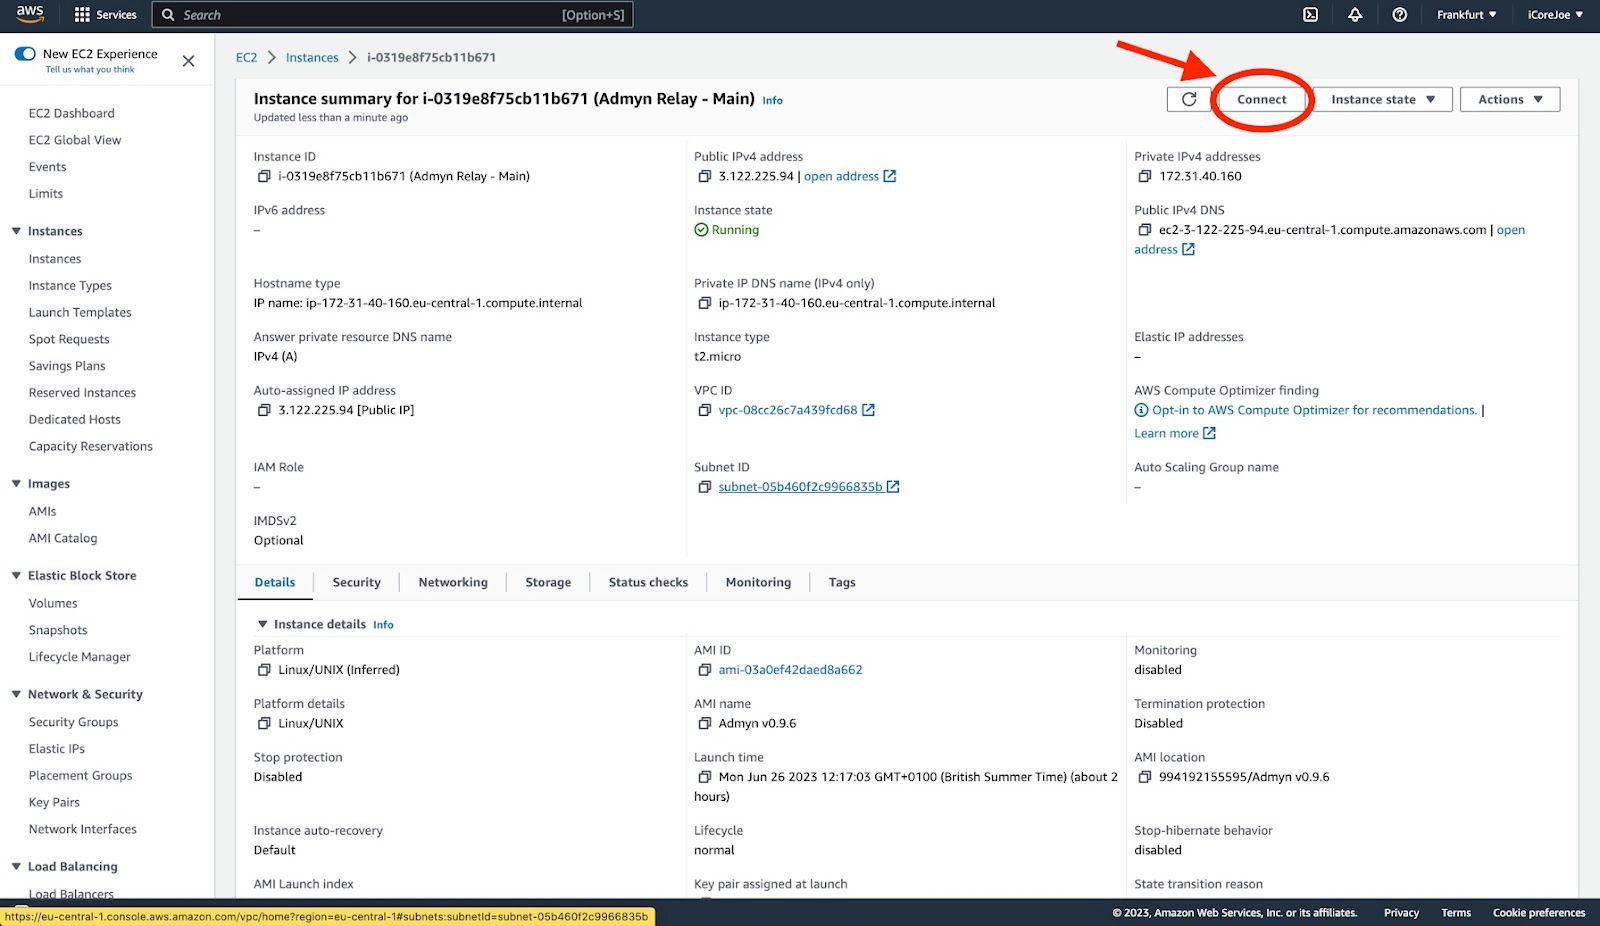
Step 3: Copy Public IPv4 Address
Copy the "Public IPv4 address" and make a note of it.
**Note: You will need this address later.
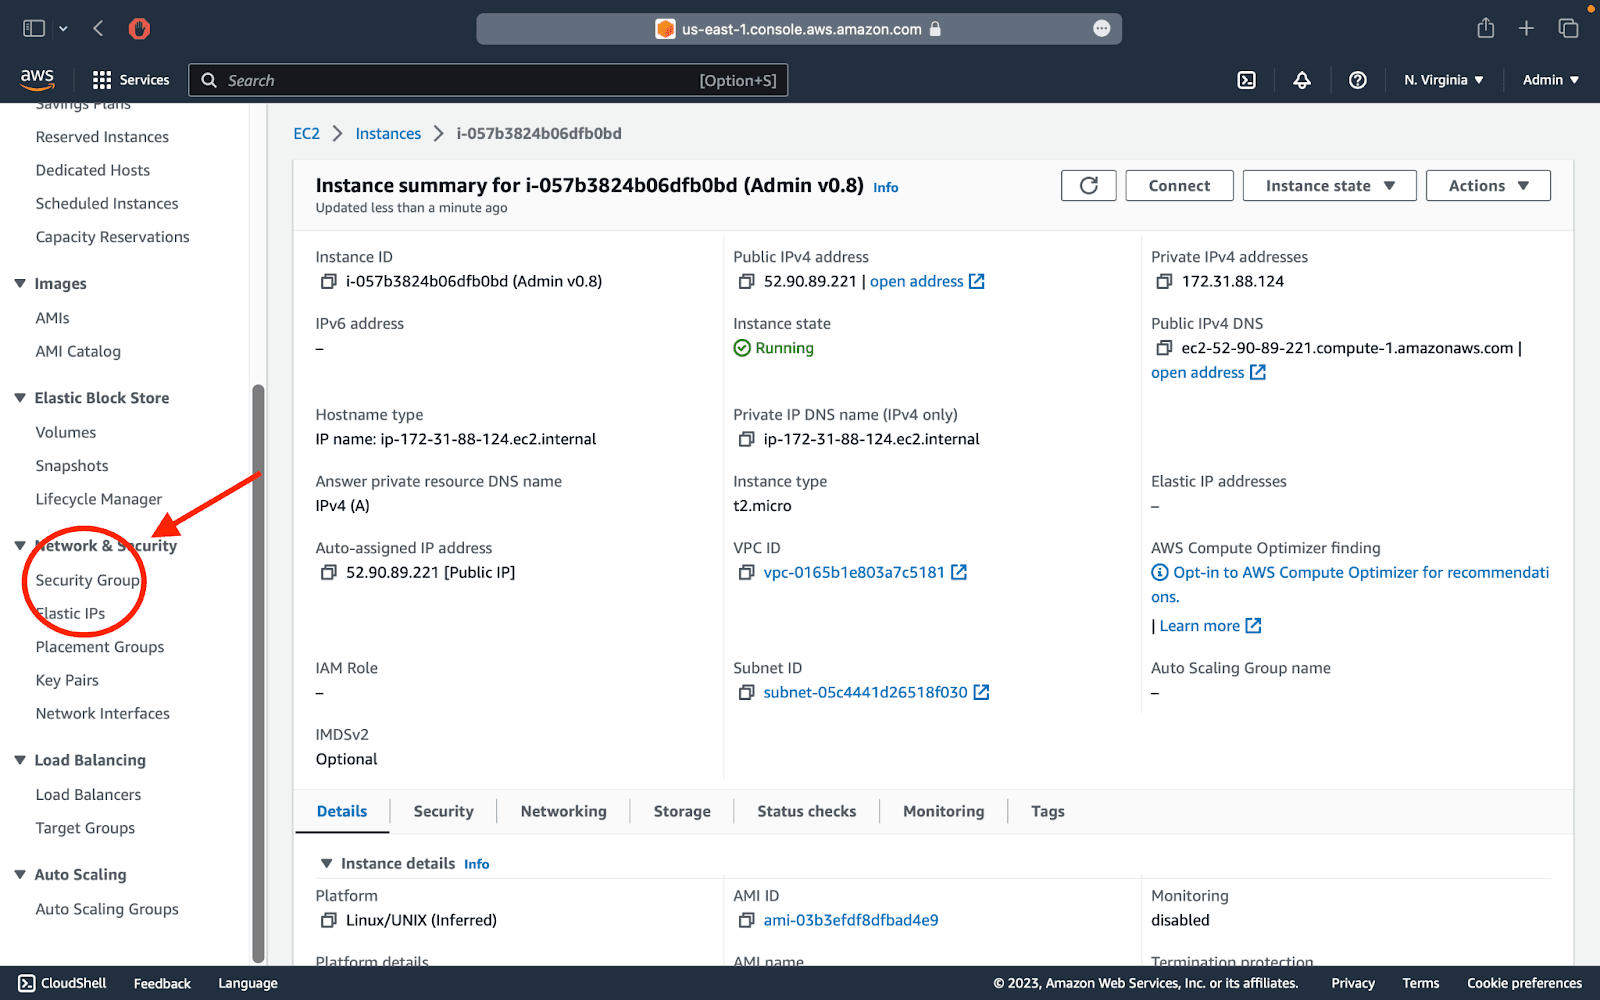
Step 4: Access Security Groups
- Scroll down on the left toolbar and find "Network & Security".
- Click "Security Groups".
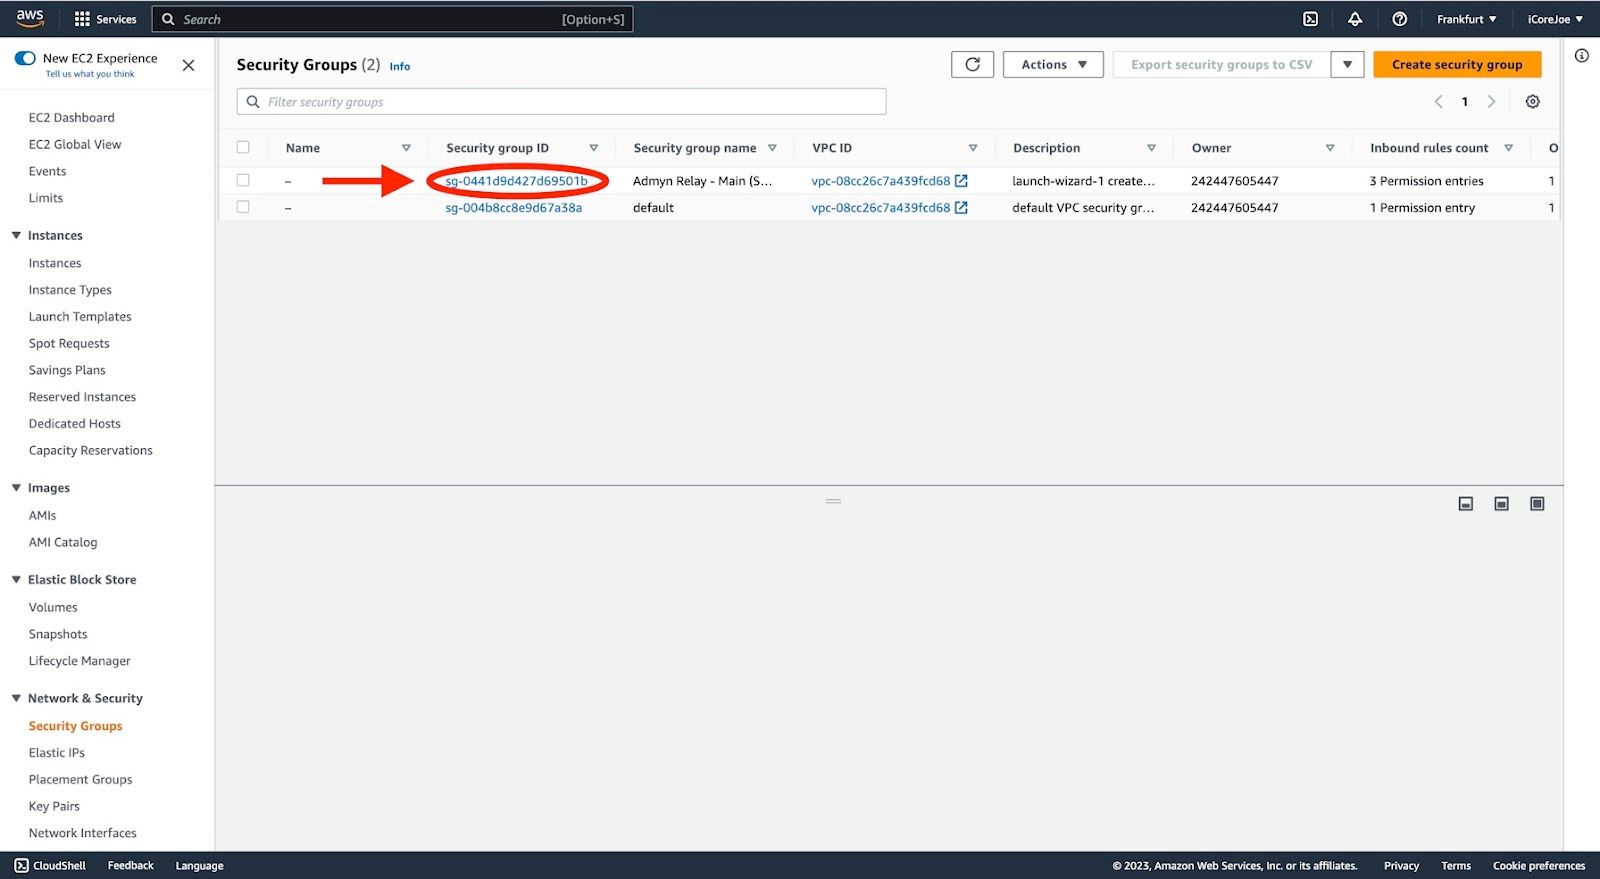
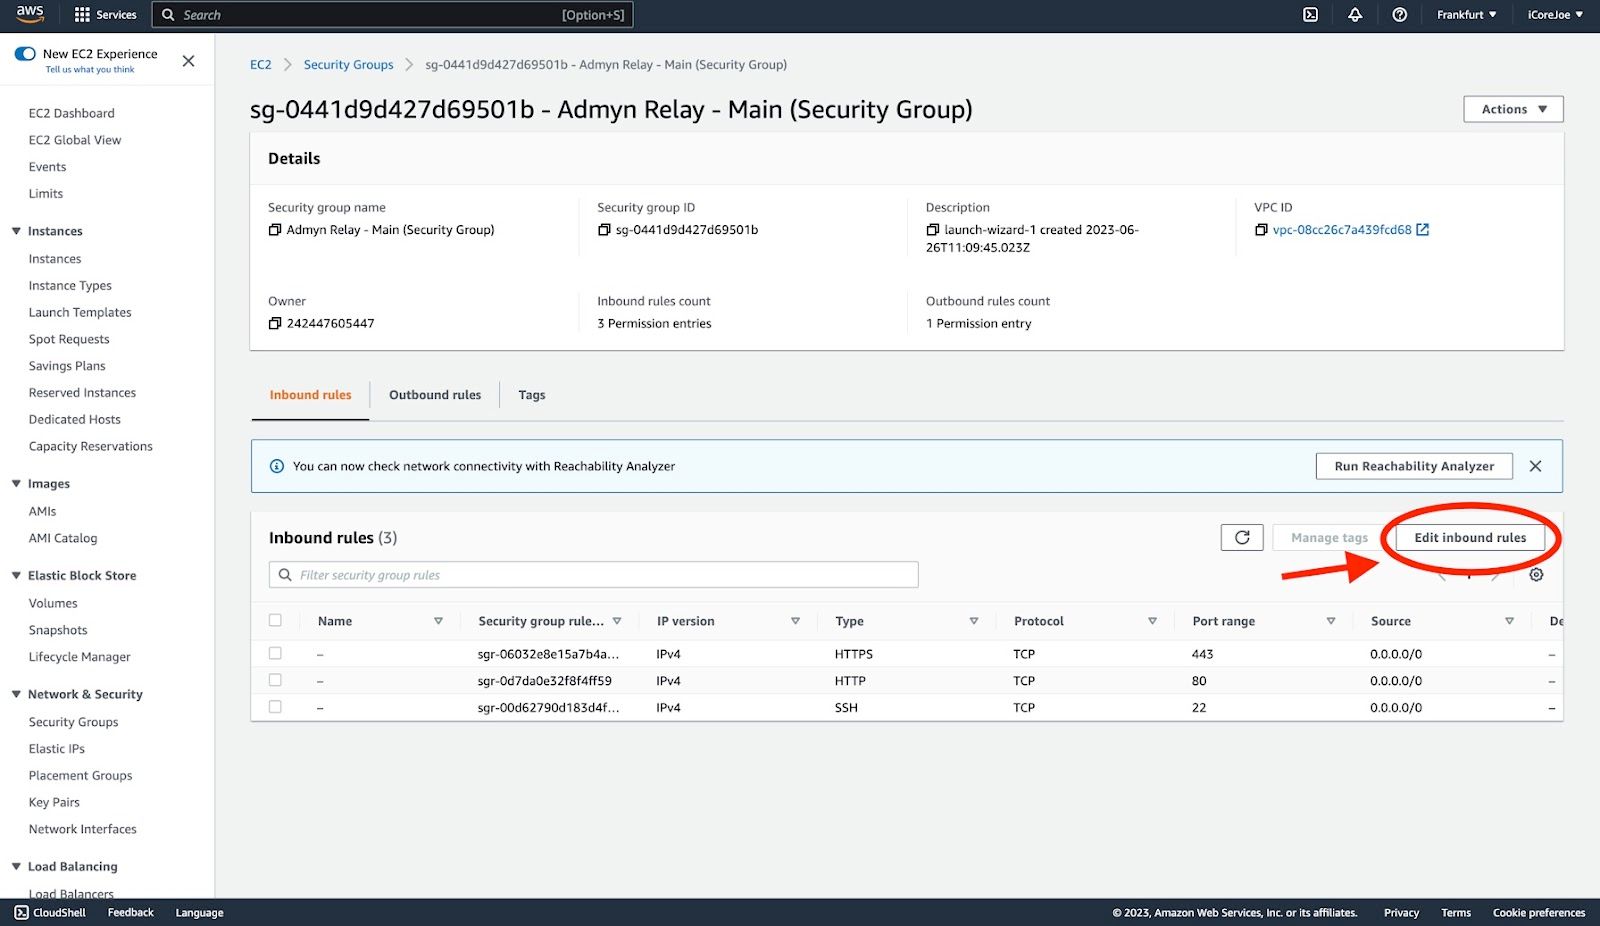
Step 5: Select Security Group
- Click on the "Security group ID" of the previously created security group.
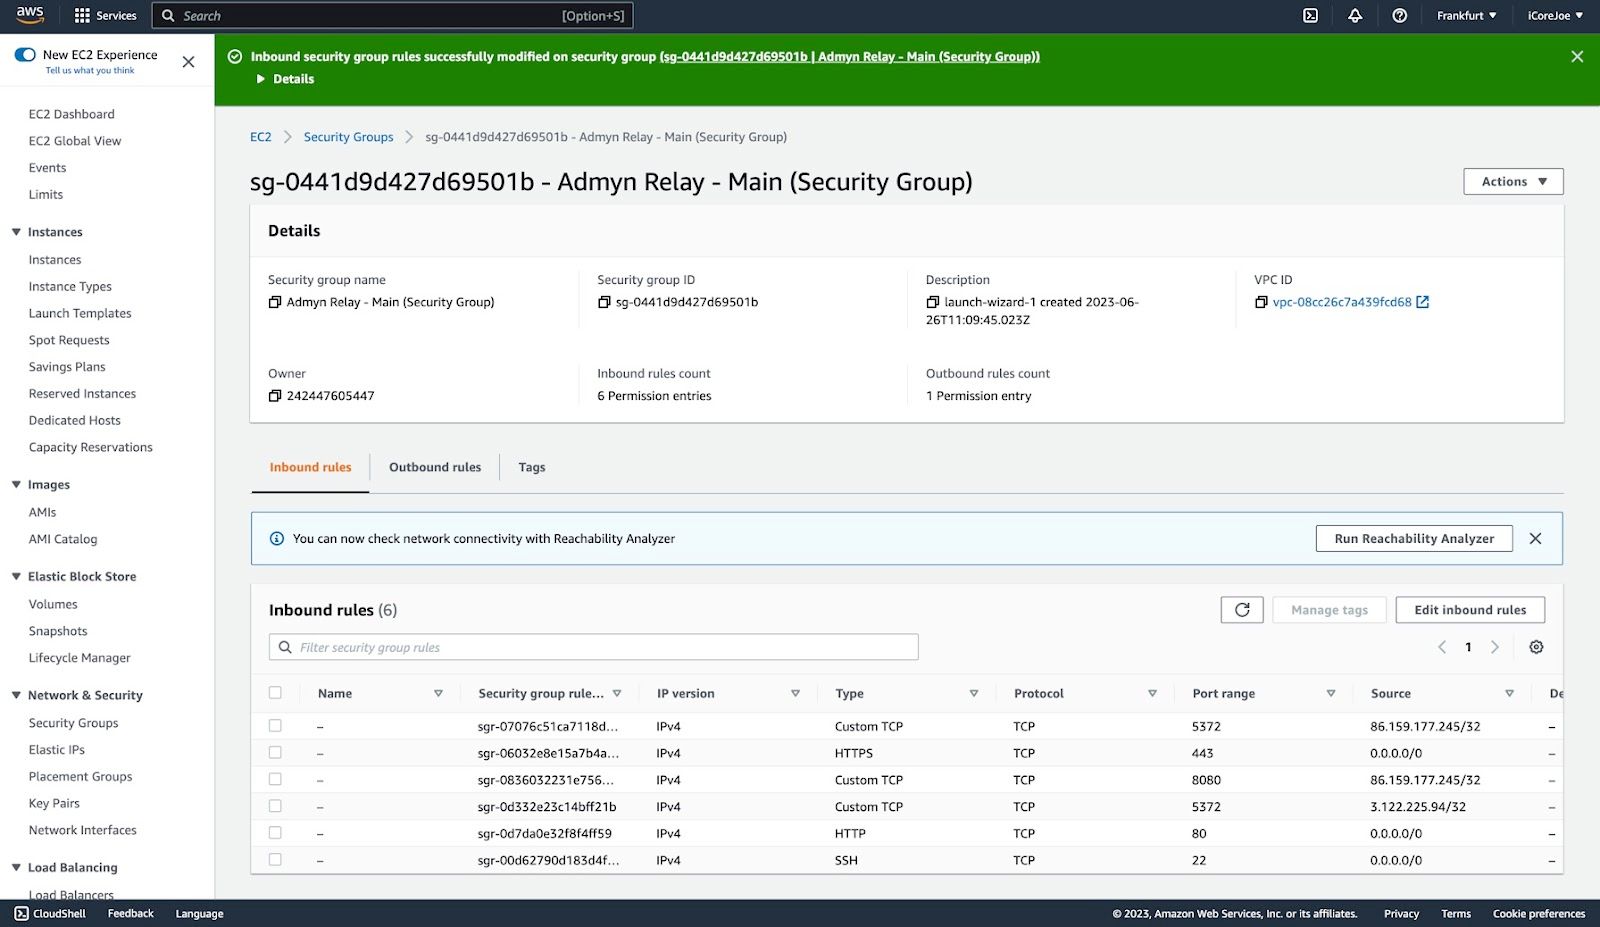
Step 6: Edit Inbound Rules
1. Scroll down and click "Edit inbound rules".
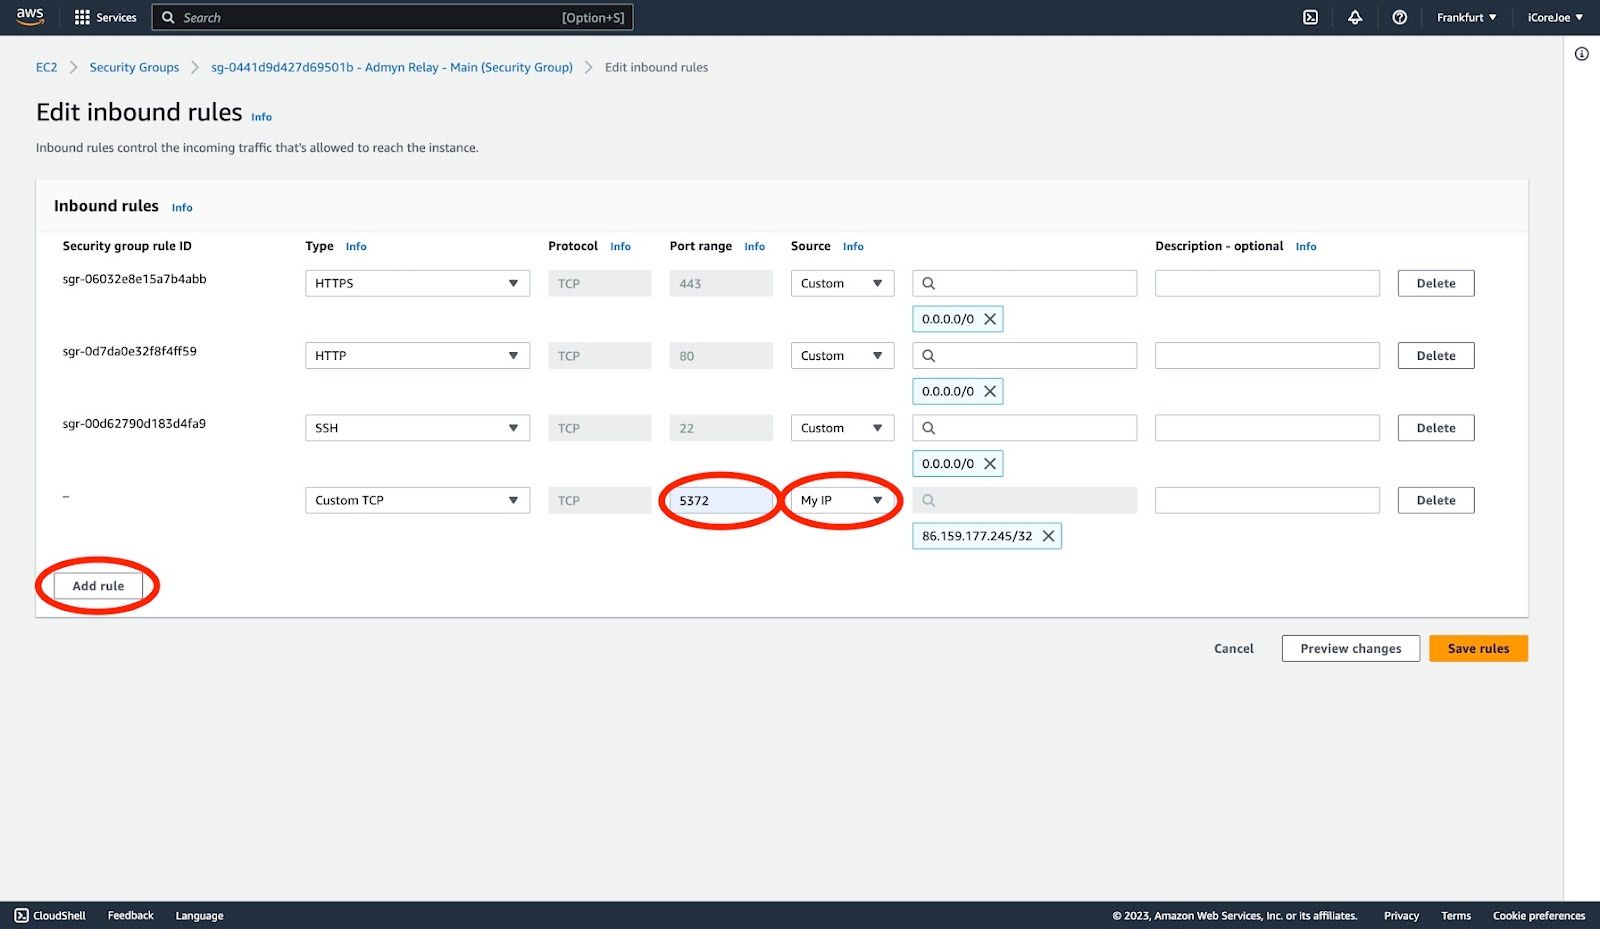
Step 7: Add Rule for Port 5372
- Click "Add rule".
- Edit the new port range to "5372".
- Set the source type to "My IP".
**Note: By enabling this, you grant the specified IP addresses access to the Admin panel on port :5372.
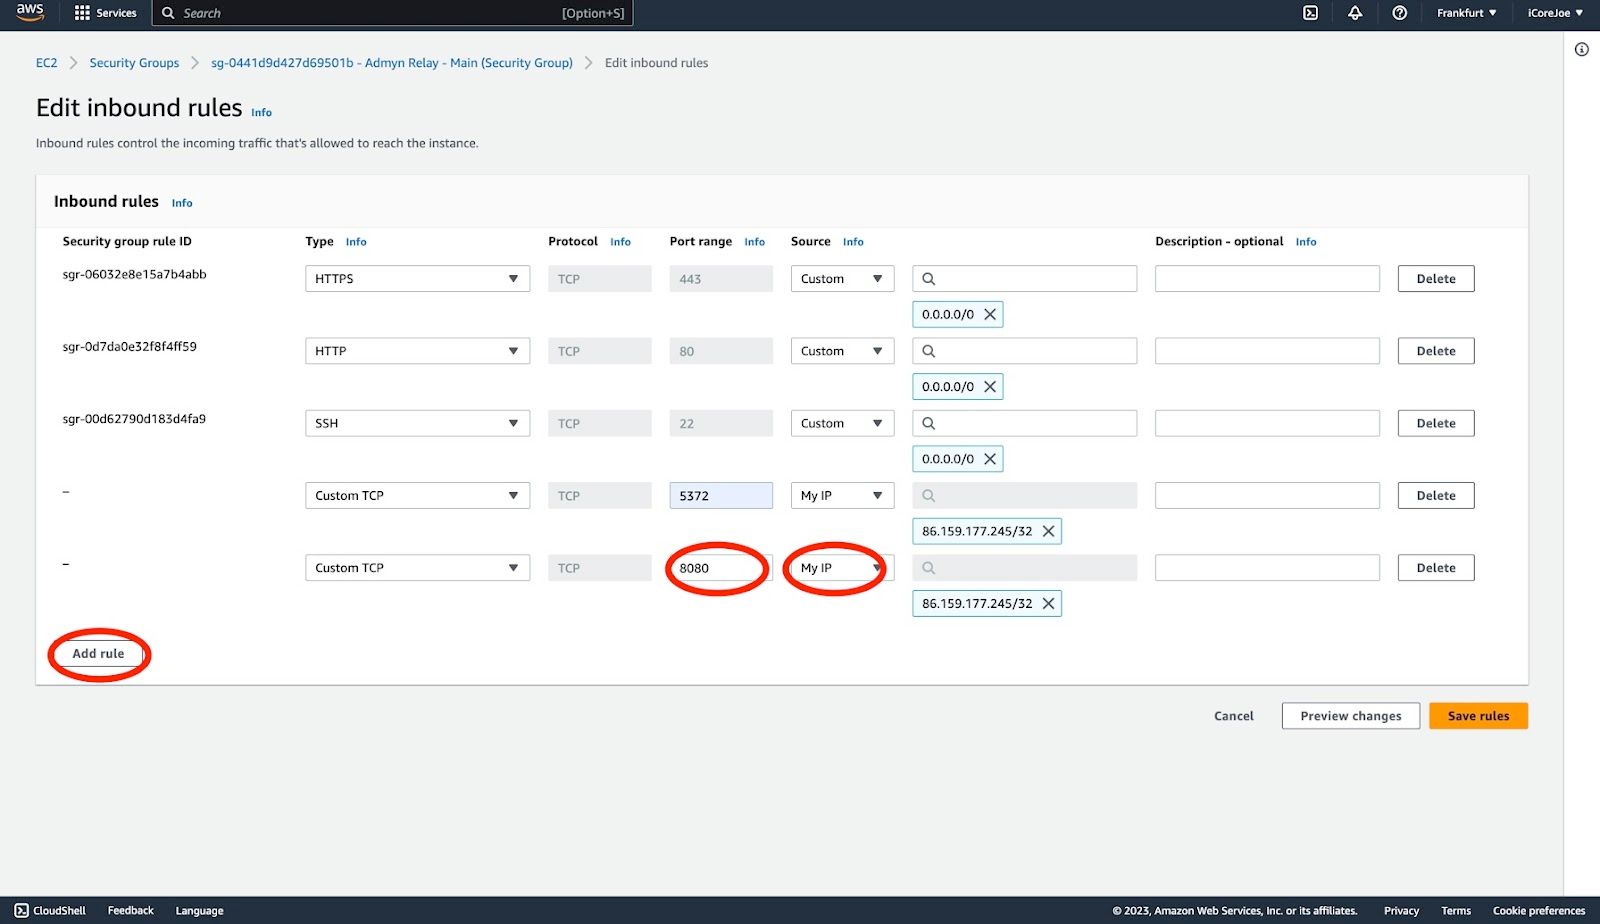
Step 8: Add Rule for Port 8080
- Click "Add rule".
- Edit the new port range to "8080".
- Set the source type to "My IP"
- Click "Add rule".
Note: By enabling this, you grant the specified IP addresses access to the relay console websocket on the Admin panel on port :8080.
Step 9: Add Rule for Port 5372 with IP Address of Admyn
- Click "Add rule".
- Edit the new port range to "5372".
- Paste the previously copied IP address into the source field.
- Ensure to select the option for "/32" at the end of the IP.
- Click "Save rules".
Note: It’s crucial that you add this rule as this allows the Transaction Log on the Admyn panel to interact with the relay.

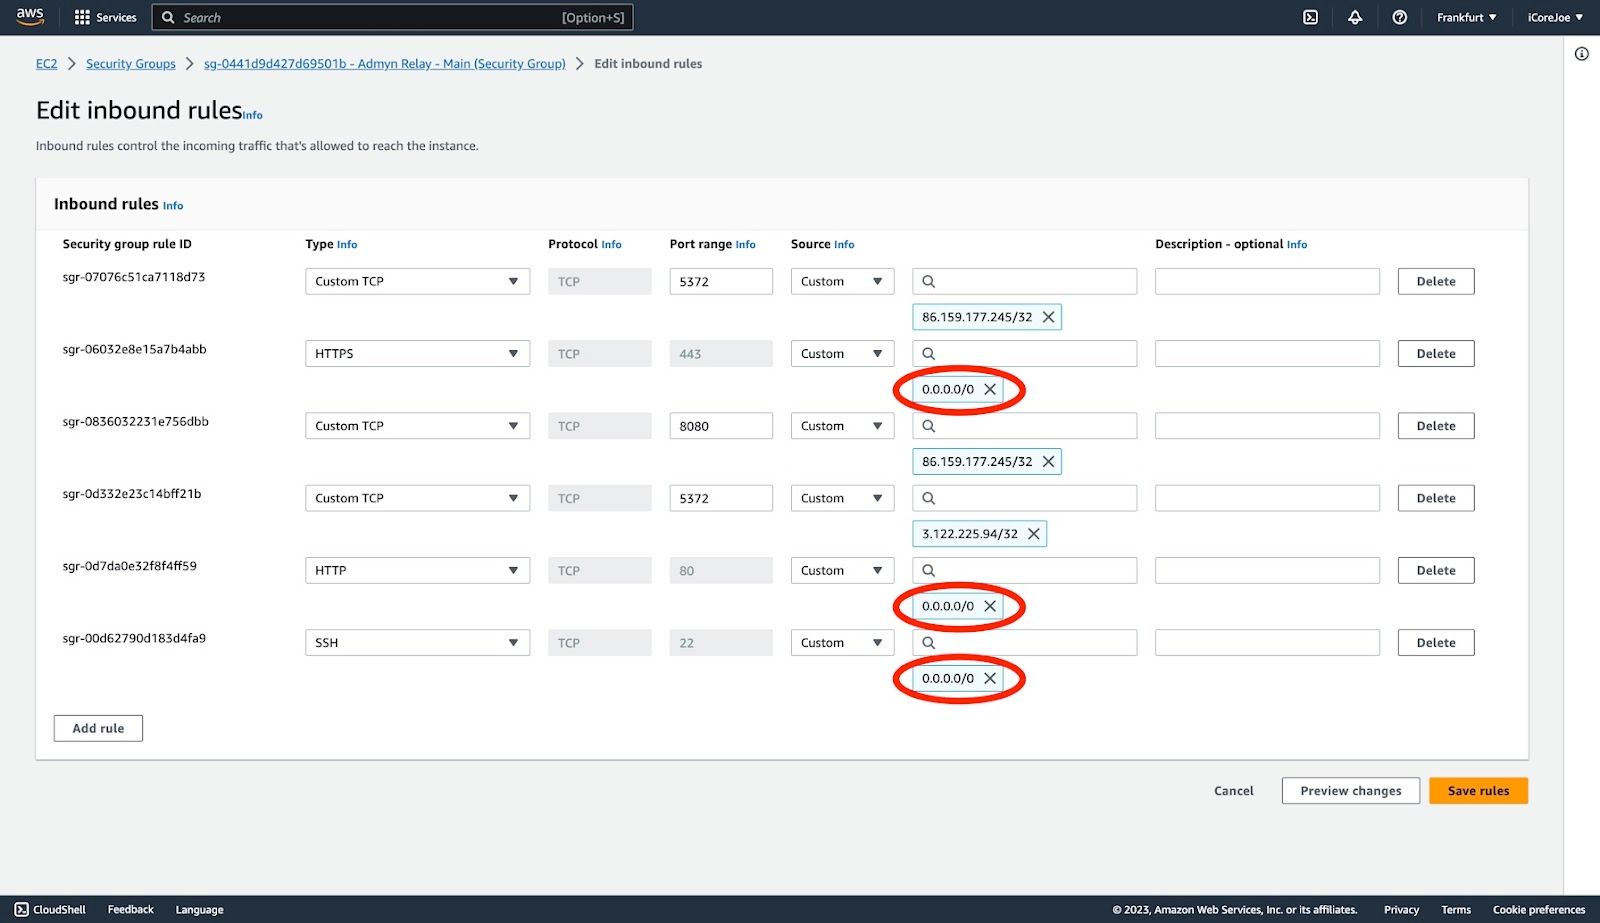
Step 10: Required Rules
If HTTP, SSH and HTTPS are NOT set to 0.0.0.0/0 (as shown in example).Then please make these changes.
Step 11: Success
Congratulations! You have successfully configured the security groups.
Continue to the next page for instructions on connecting to the Admyn Panel.
Configure Domain Pointing
Step 1: Log in to your domain provider account
Visit the website of your domain provider and log in to your account using your credentials.
Step 2: Access Domain Management
Navigate to the domain management section or domain settings page.
Step 3: Go to DNS Management
Look for the DNS management or DNS settings for your domain.
Step 4: Edit A Record
Locate the A record associated with your domain or look for an option to add a new DNS record.
Step 5: Update IP Address
In the appropriate field, enter the IPv4 address you copied earlier from the iCore Admyn panel.
Step 6: Save Changes
Click the "Save" or "Update" button to save the changes to your DNS settings.
Step 7: Wait for Propagation
DNS changes may take some time to propagate across the internet. It usually takes a few minutes to a few hours, but it can take up to 48 hours. Please allow some time for the changes to take effect.
Note: The instructions provided here are general guidelines. The exact steps may vary slightly depending on the interface and options provided by your domain provider. If you encounter any difficulties or have specific questions, it's recommended to refer to the support documentation or contact the customer support of your domain provider for further assistance.
Connecting to the Admyn Panel
To access the Admyn Panel and begin the configuration process, follow the steps below.
Option 1: Quick Connection (Recommended)
Step 1: Access Instance Details
- Go to the "Instances" page.
Step 2: Go to Instance ID
- Click on the "Instance ID" of the previously created instance.
Step 3: Connect to the instance
- Click "Connect to instance".
Step 4: Use EC2 Instance Connect
- Click "EC2 Instance Connect".
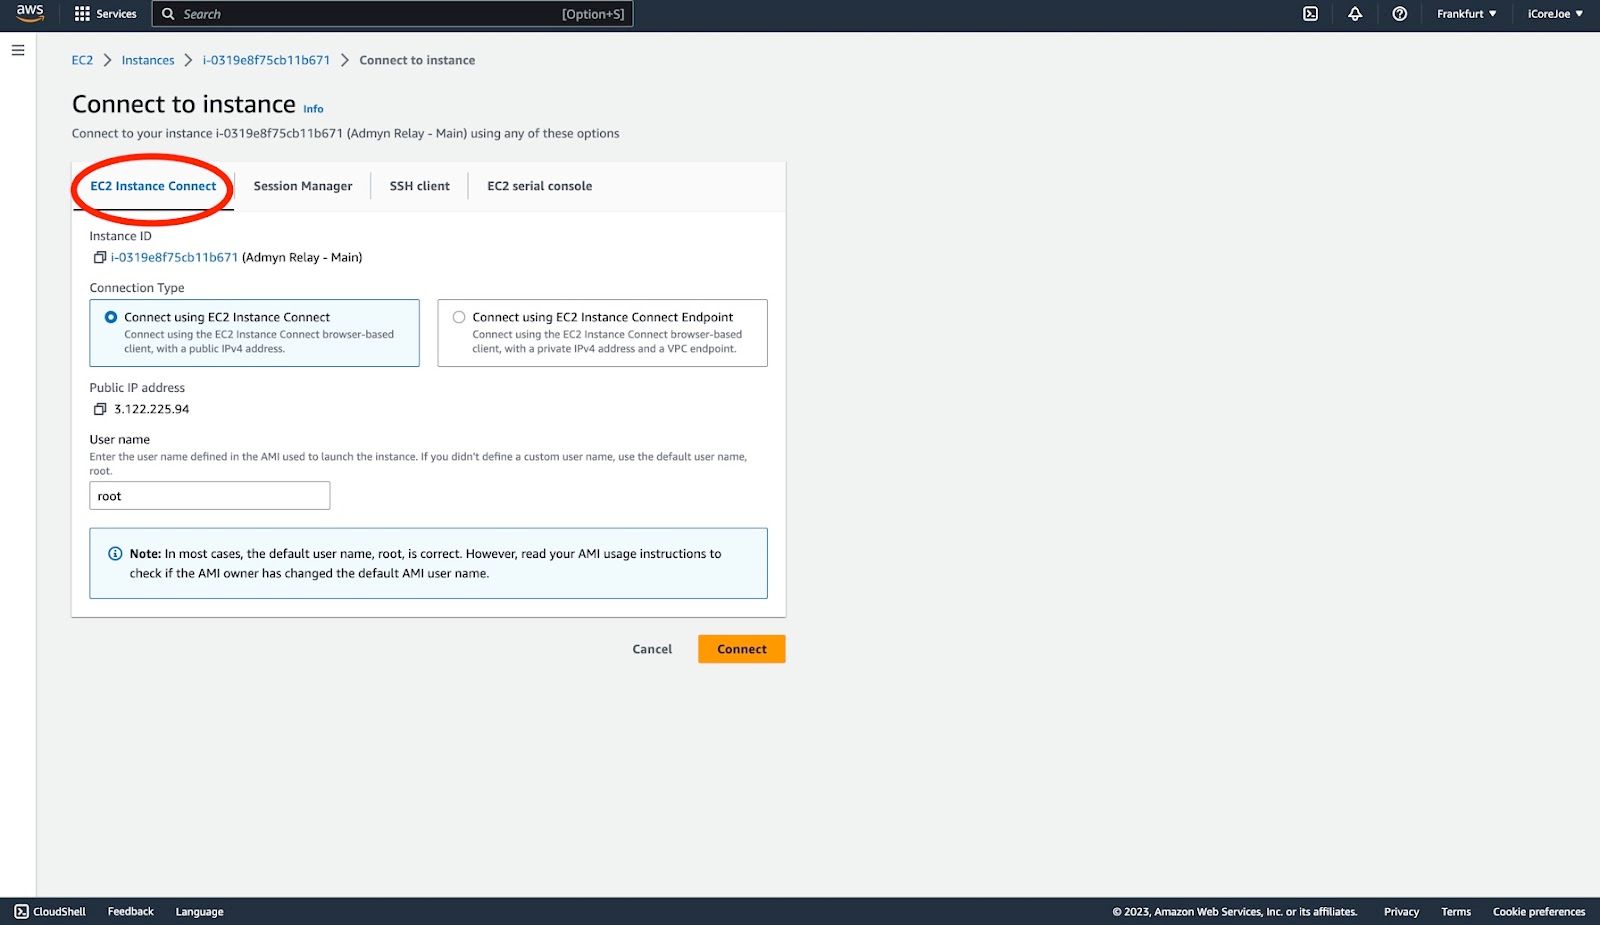
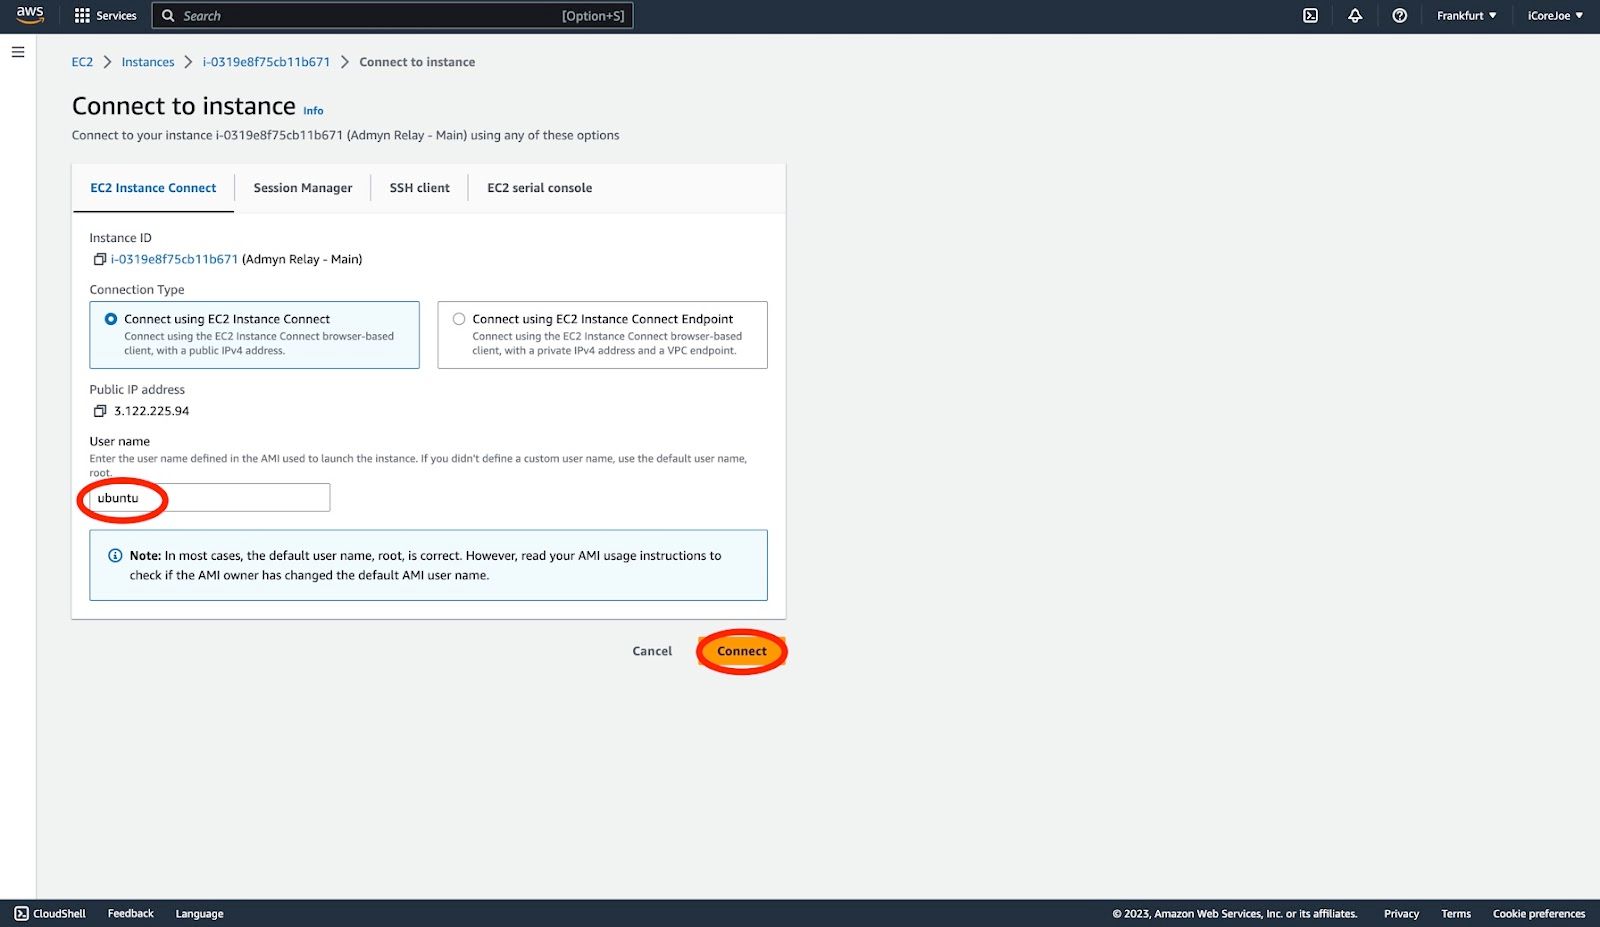
Step 5: Change Username
Change the username from "root" to "ubuntu".
Note: It's important to use the "ubuntu" username to establish the connection.
- Click "Connect".
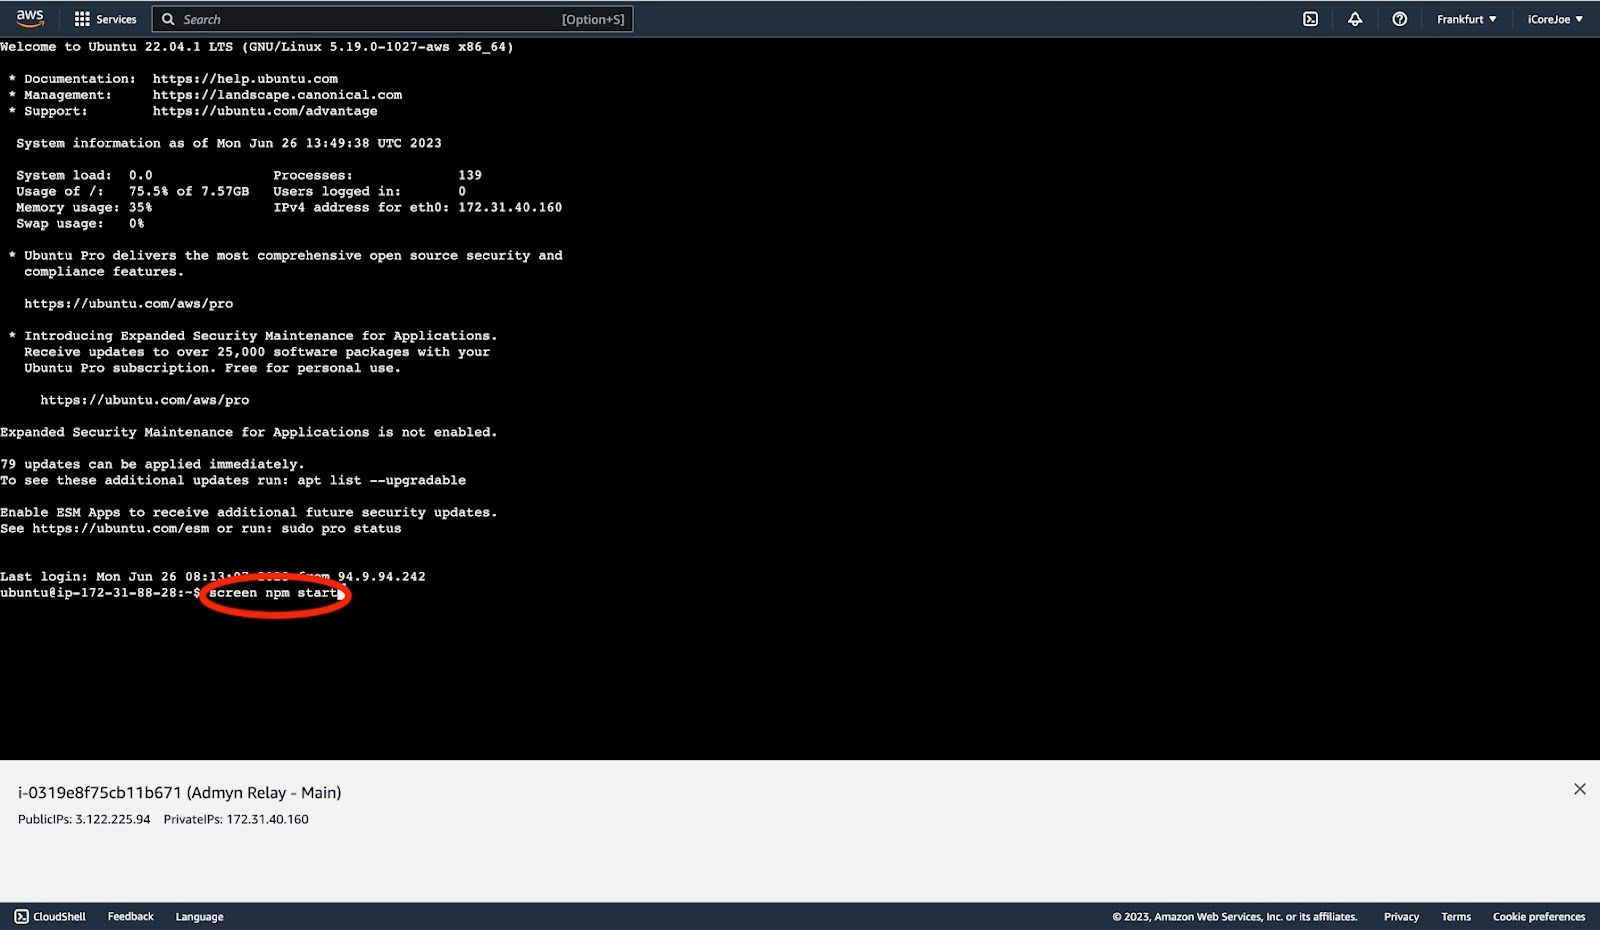
Step 6: Access the Server
- Click on the server and type screen npm start in the terminal.
- Press Enter to execute the command.
Step 7: Obtain the URL for the Admin Panel
Let the terminal load until you see the URL for your admin panel appear in the console log.
Step 8: Copy the URL
Copy the URL and make a note of it.
Note: This URL will be used to access the Admyn Panel.
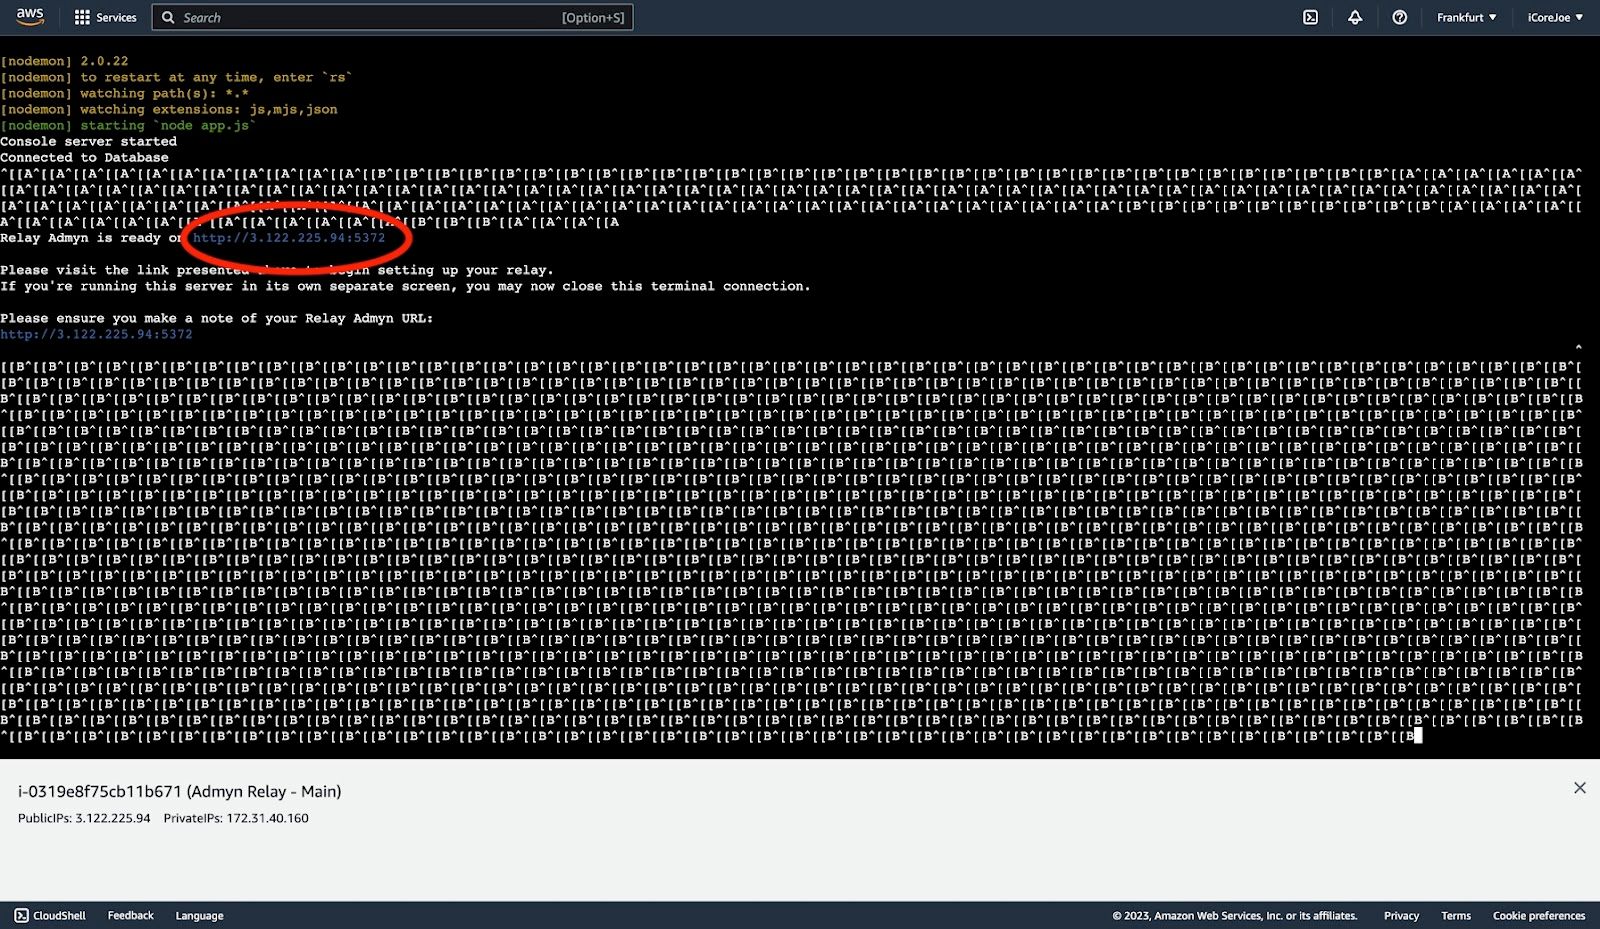
You can now close the terminal.
Option 2: Manual Connection
Step 1: Access Instance Details
- Go to the "Instances" page.
Step 2: Go to Instance ID
- Click on the "Instance ID" of the previously created instance.
Step 3: Connect to the instance
- Click "Connect".
Step 4: SSH Client
- Click the “SSH Client” tab.
Copy the the example at the bottom, it should look something like this:
ssh -i "keypair.pem" root@ec2-ipAddress.compute-1.amazonaws.com
Change “root to “ubuntu” in the command line, it should look something like this:
ssh -i "keypair.pem" ubuntu@ec2-ipAddress.compute-1.amazonaws.com
Launch your terminal.
Note: On MacOS this can be achieved by searching for the “Terminal” in the spotlight search (cmd + space).
Note: On Windows this can be achieved by searching for the “Console” in the search bar of the windows menu. (cmd).
- Locate the folder that you have saved your keypair.pem file to.
- Paste the command you copied earlier into the terminal and press enter.
Step 5: Access the Server
- Click on the server and type screen npm start in the terminal.
- Press Enter to execute the command
Step 6: Obtain the URL for the Admin Panel
- Let the terminal load until you see the URL for your admin panel appear in the console log.
Step 7: Copy the URL
Copy the URL and make a note of it.
Note: This URL will be used to access the Admyn Panel.
You can now close the terminal.
Option 3: Windows PuTTY Connection
Note: If you are unable to connect to the EC2 instance through your terminal in Windows, please consider using PuTTY to connect. The documentation for a PuTTY connection can be found here.
Configuring the Admyn Panel
Follow the steps below to configure the Admyn Panel using the obtained URL.
Step 1: Open the Admyn Panel
- Copy the relay URL from the previous step.
Paste the URL into a new tab in your browser.
Note: This will take you to the Admyn Panel where you can create your account.
Step 2: Create an Account
Create an account to access the Admyn Panel by entering a username and password.
Note: Avoid using spaces or capital letters in the username.
Step 3: Access the Admyn Panel Dashboard
- Once signed in, you will be redirected to the Admyn Panel dashboard.
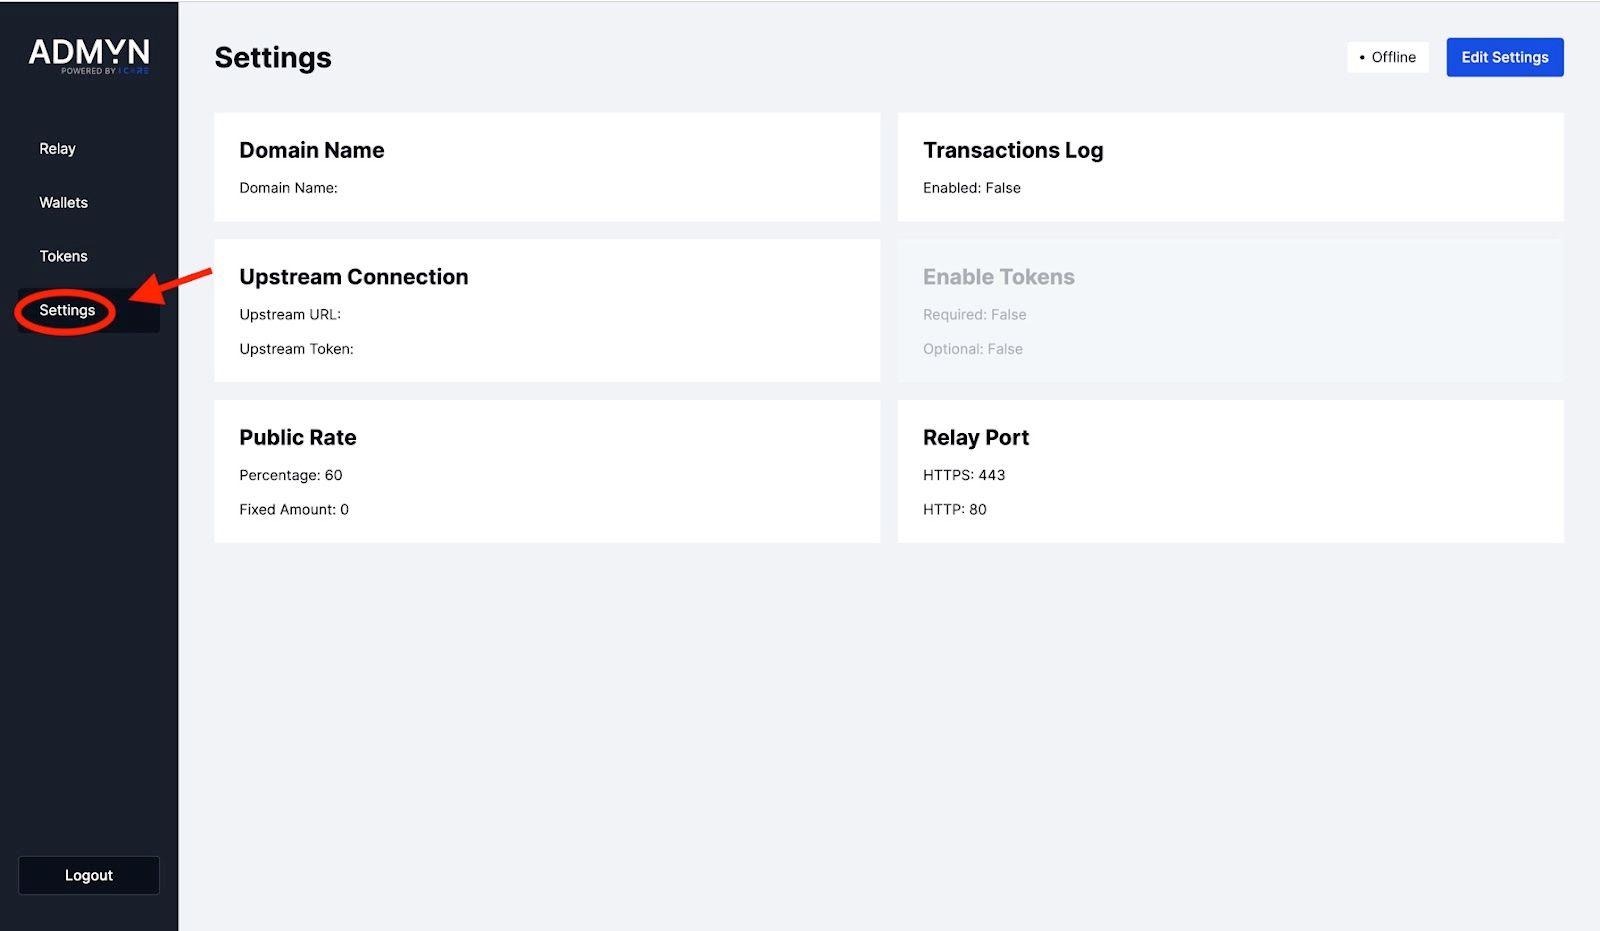
Step 4: Access Configuration Settings
- Click "settings" on the toolbar located on the left side of the dashboard.
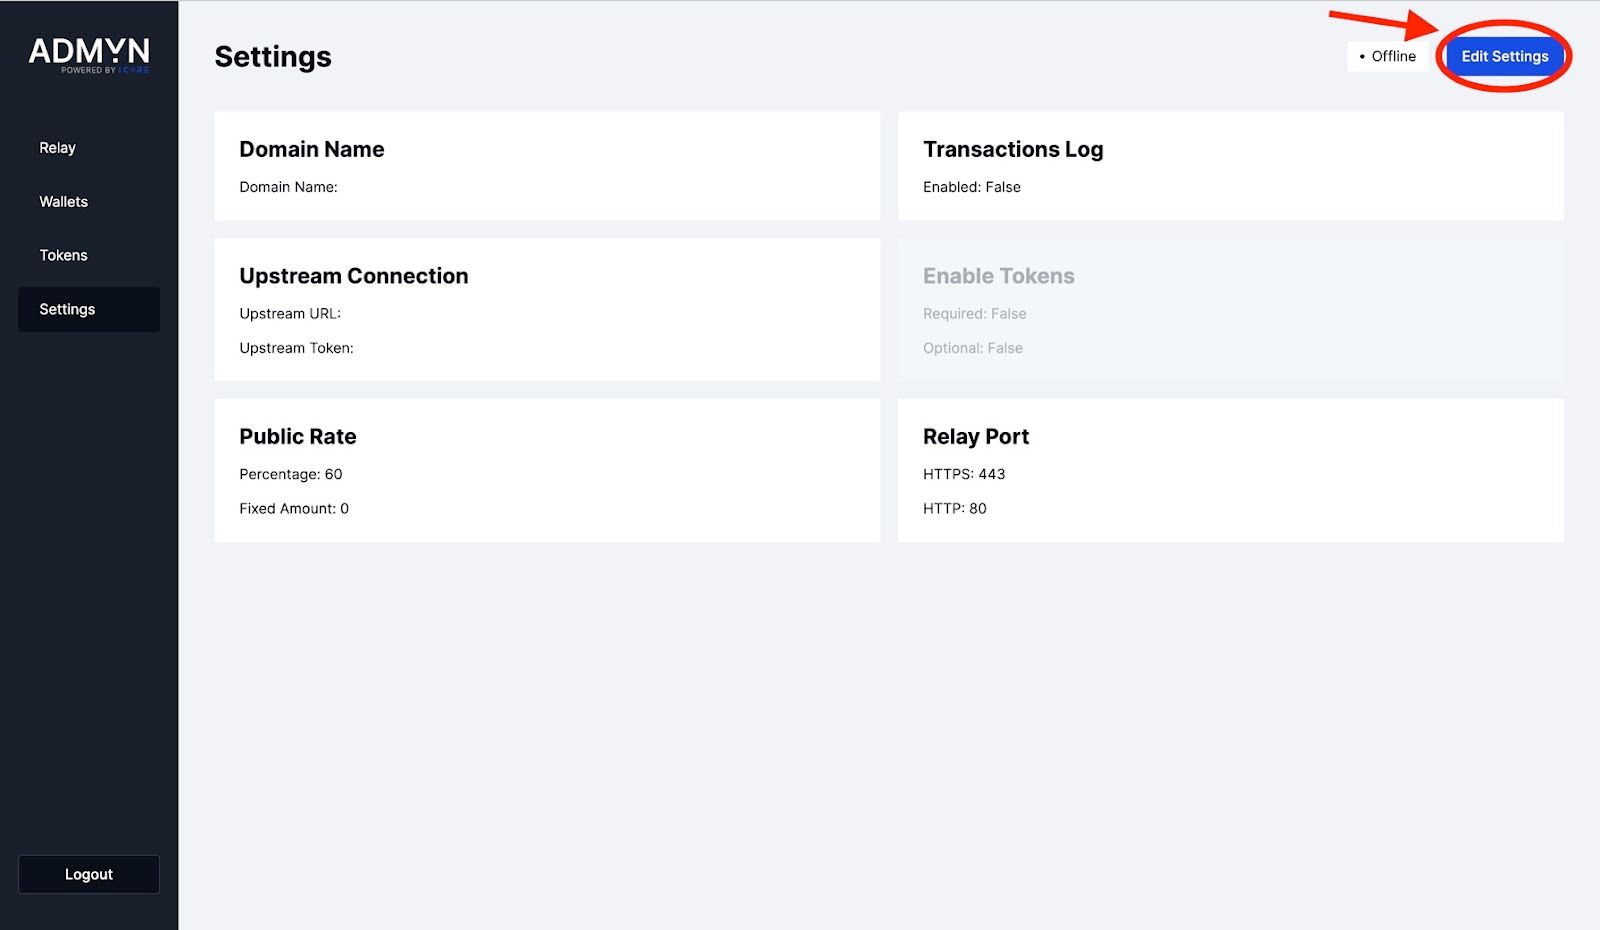
Step 5: Edit Configuration
- Click "Edit settings".
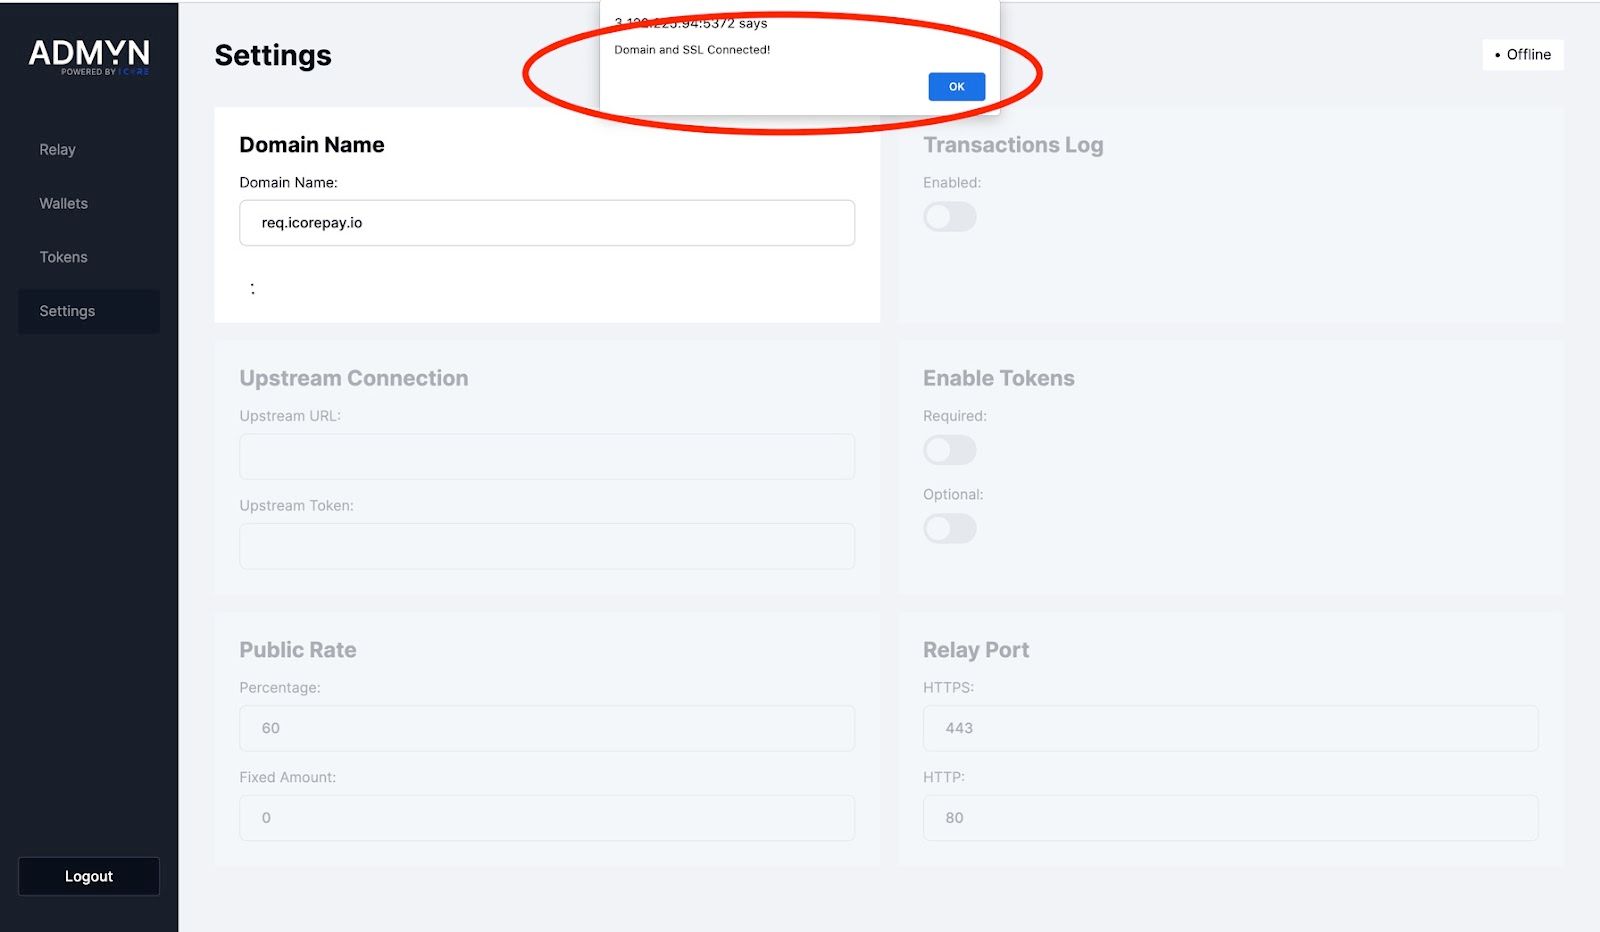
Step 6: Configure Domain Name
Click on the "Domain Name" field and enter your domain name.
Note: Your domain must be pointed to the IP address of this server that you copied earlier.
Click "Connect Domain".
Note: Wait for the process to finish, as it may take a few minutes. Ensure you see a success message.
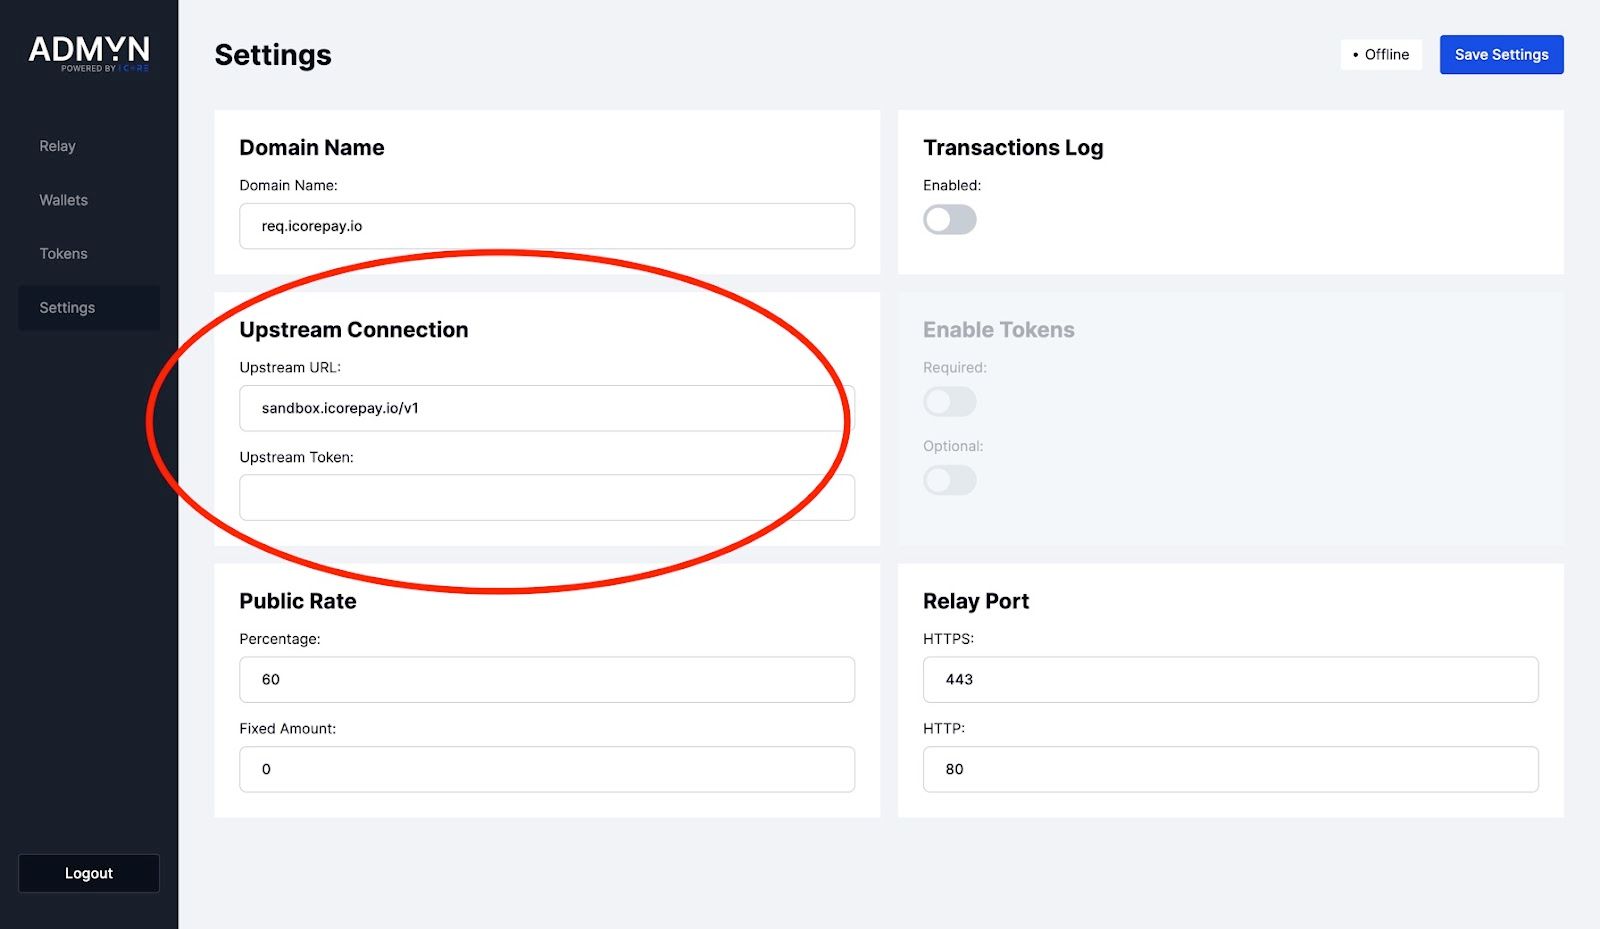
Step 7: Enter Upstream URL and Token
Enter the provided upstream URL into the "Upstream URL" field
Note: Please ensure that the url ends in ‘/v1’
If provided, copy the JWT (Upstream token) into the "Upstream token" field.
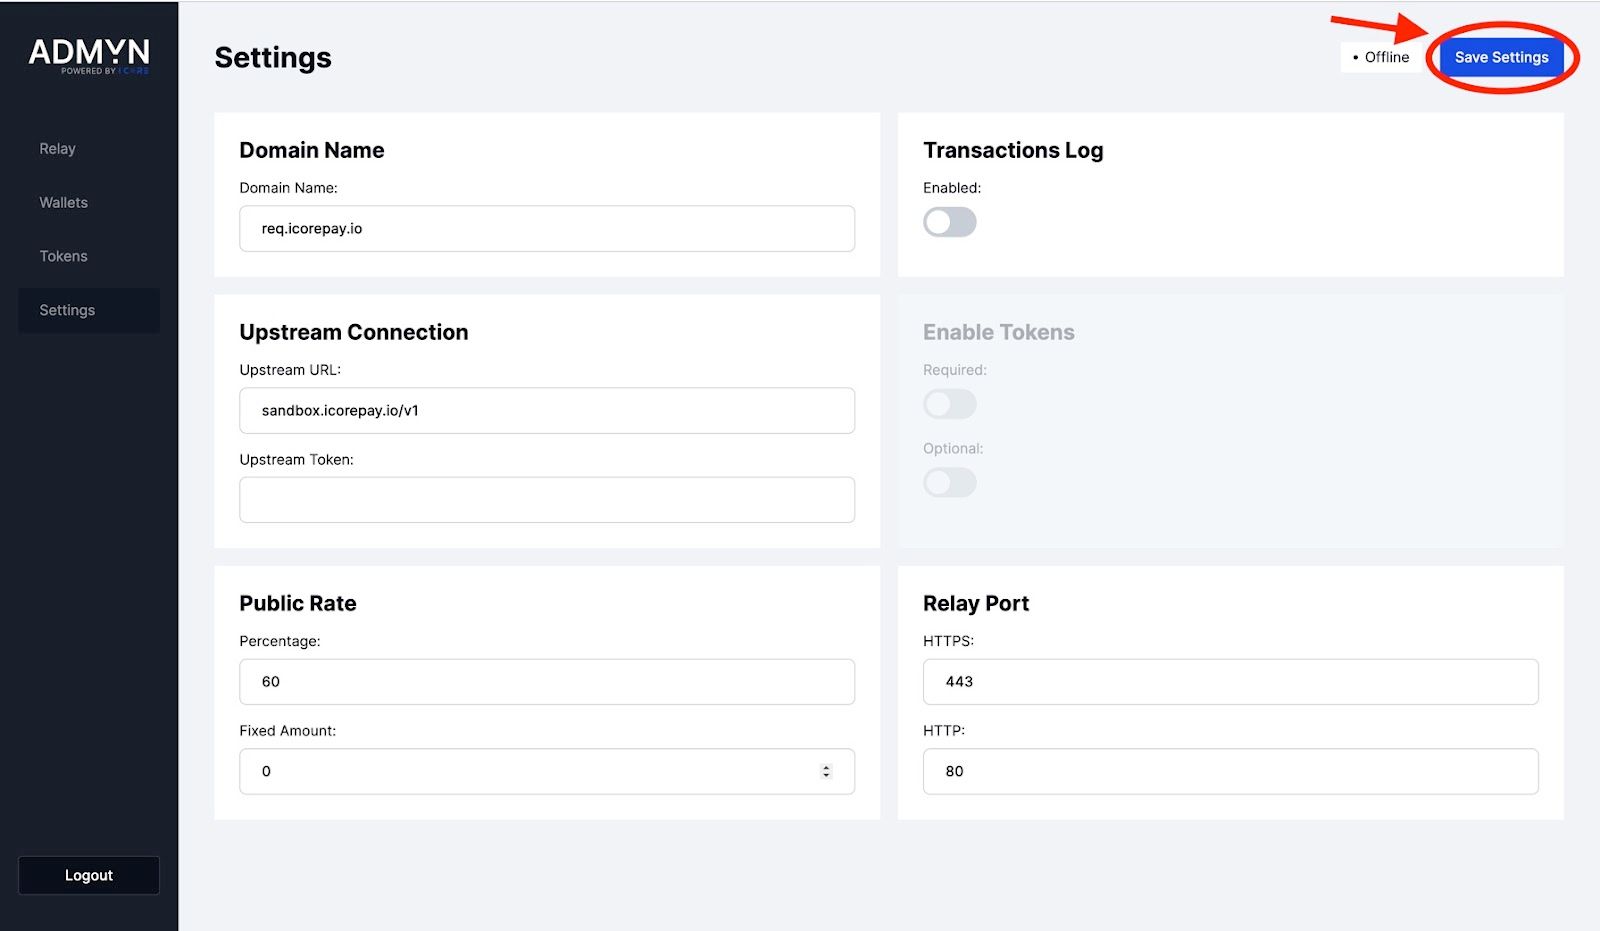
Step 8: Save Configuration
- Click "Save Settings" in the top right corner.
Configuring the Wallet
Follow these steps to configure the wallet in the Admyn Panel.
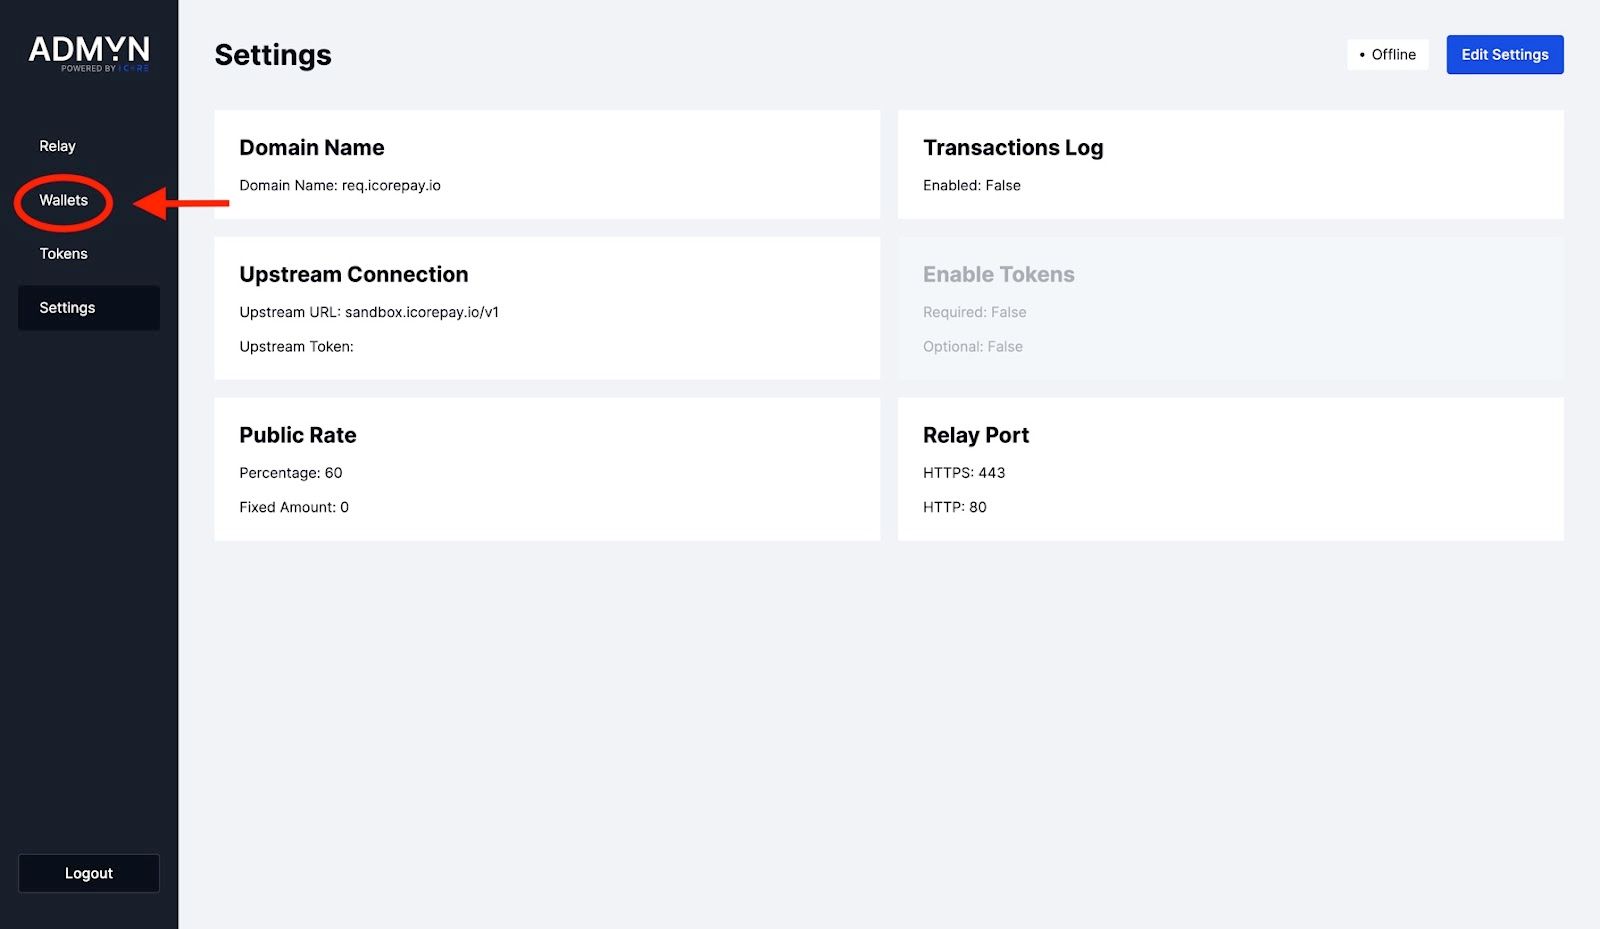
Step 1: Access Wallet Settings
- Click "Wallet" on the toolbar located on the left side of the dashboard.
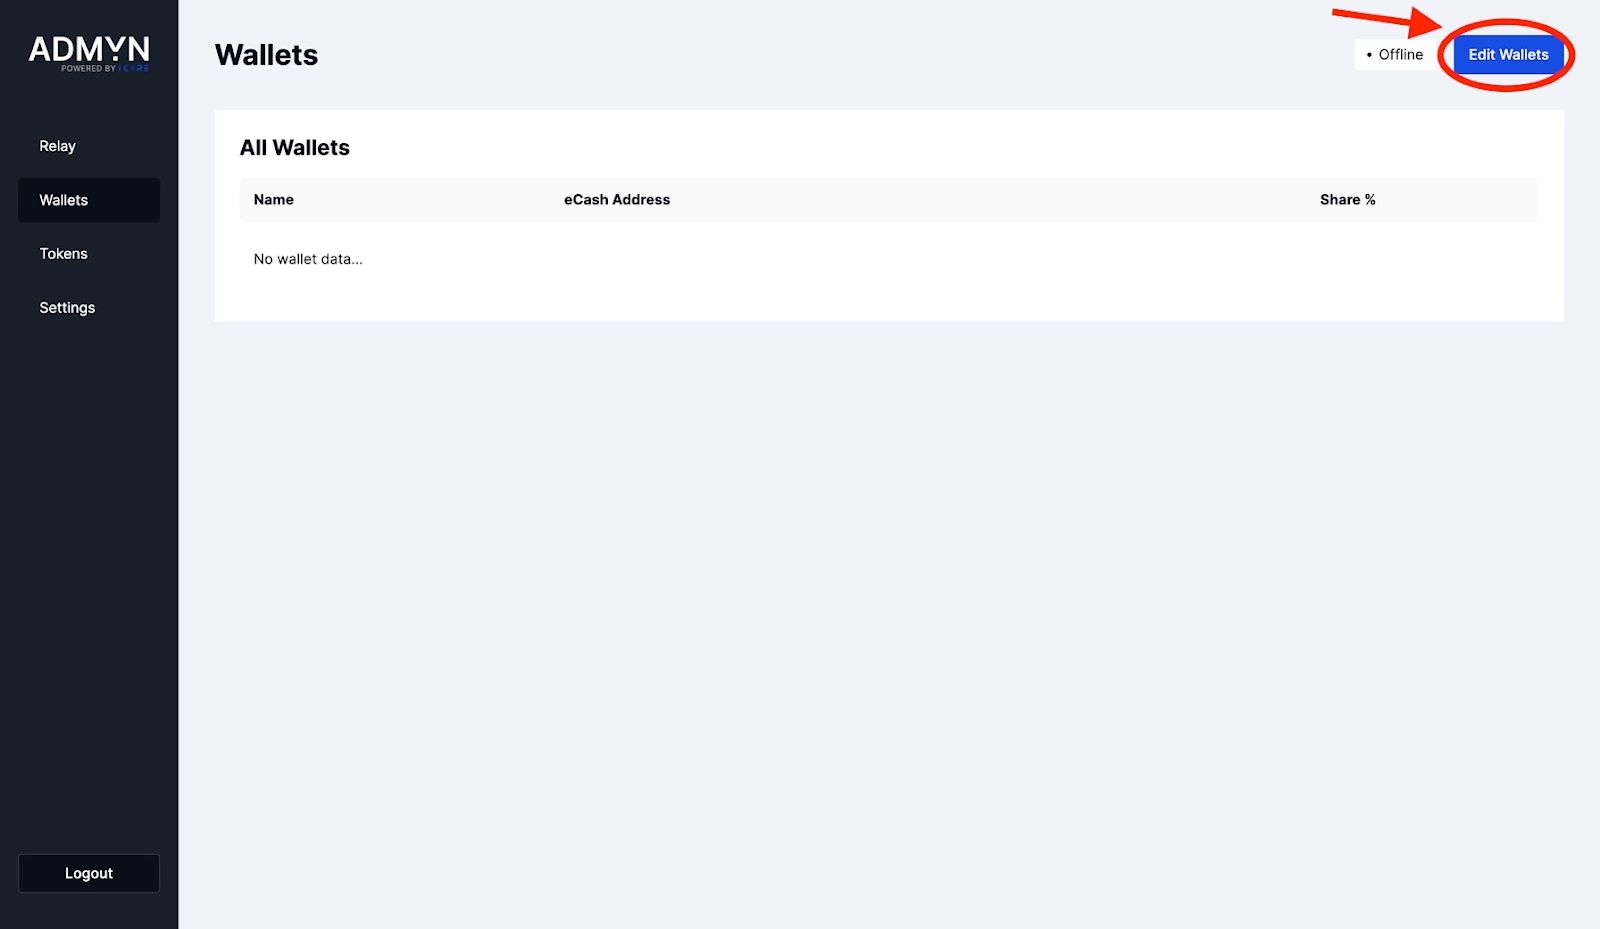
Step 2: Edit Wallet
- Click "Edit Wallets" in the top right corner.
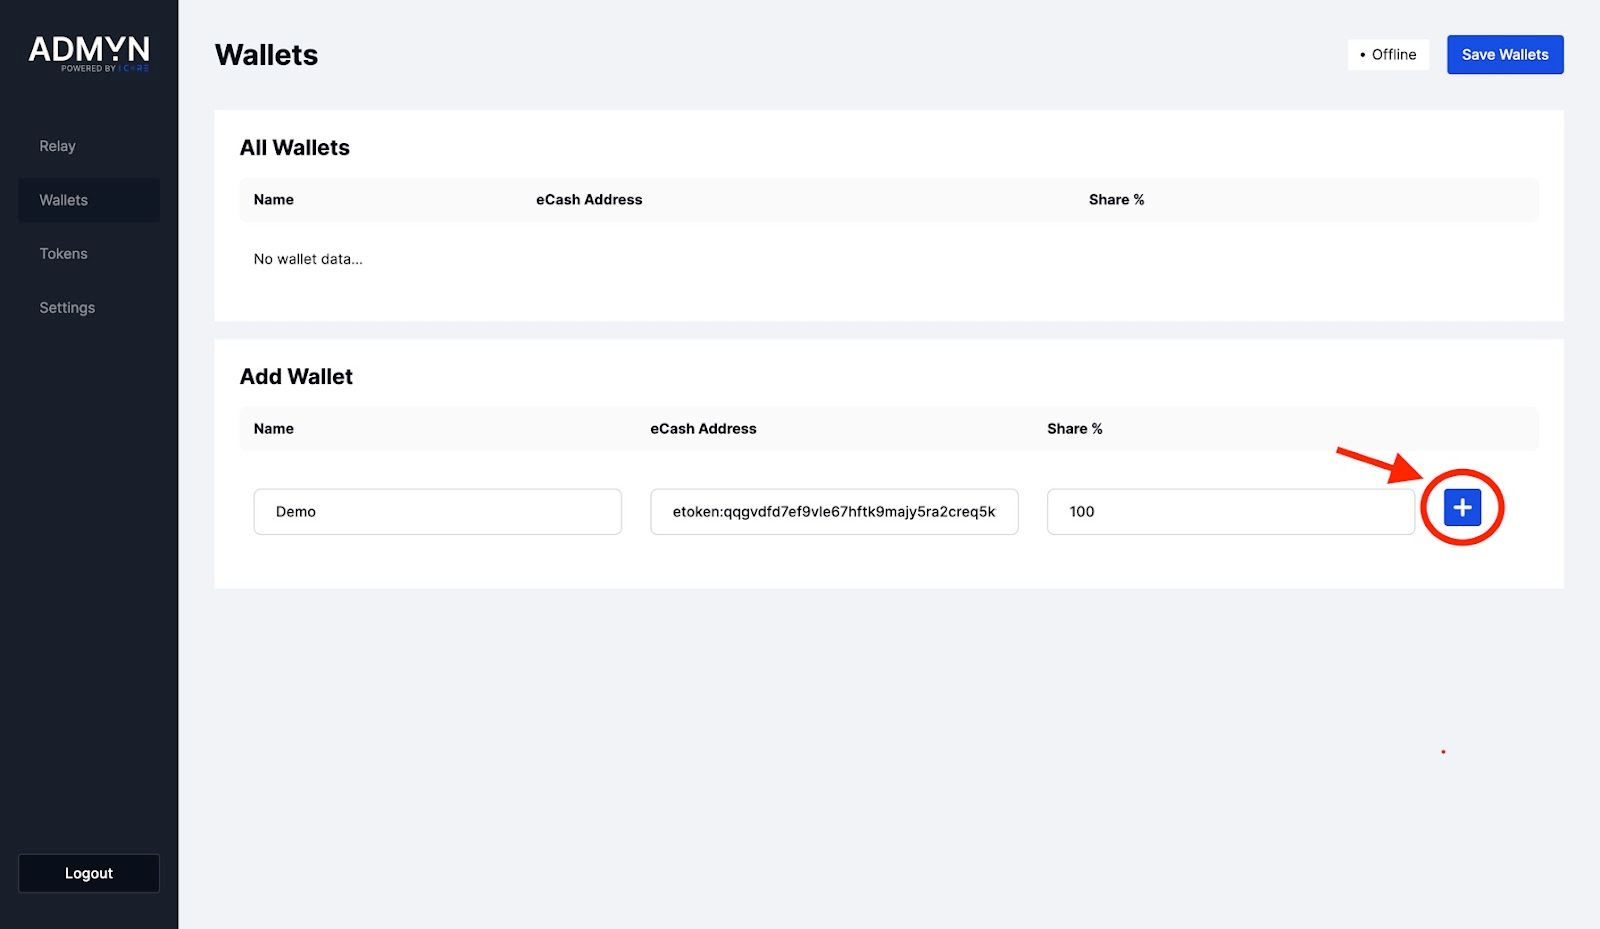
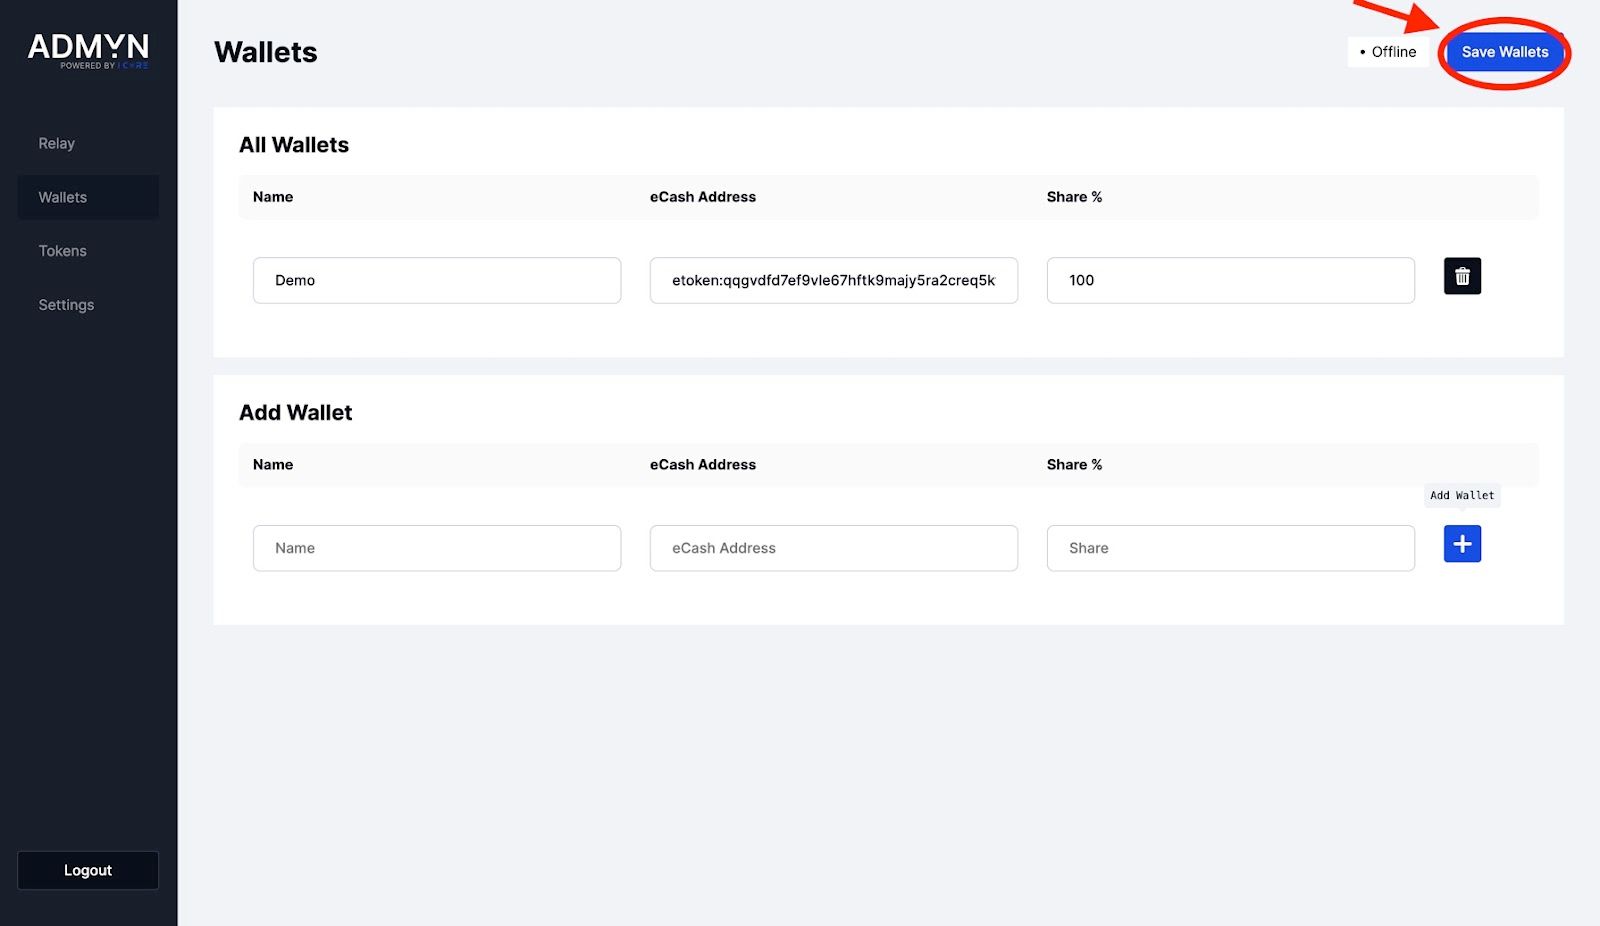
Step 3: Add Individuals to the Wallet
- Add individuals to the wallet by providing their name, eCash wallet, and share.
- Click the "+" button for each individual.
Step 4: Save Wallets
- Click "Save Wallets".
Starting Your Relay
Once you have configured your relay and wallets, you can start your relay using the following instructions.
Step 1: Access the Relay
- Click "Relay" on the toolbar located on the left side of the dashboard.
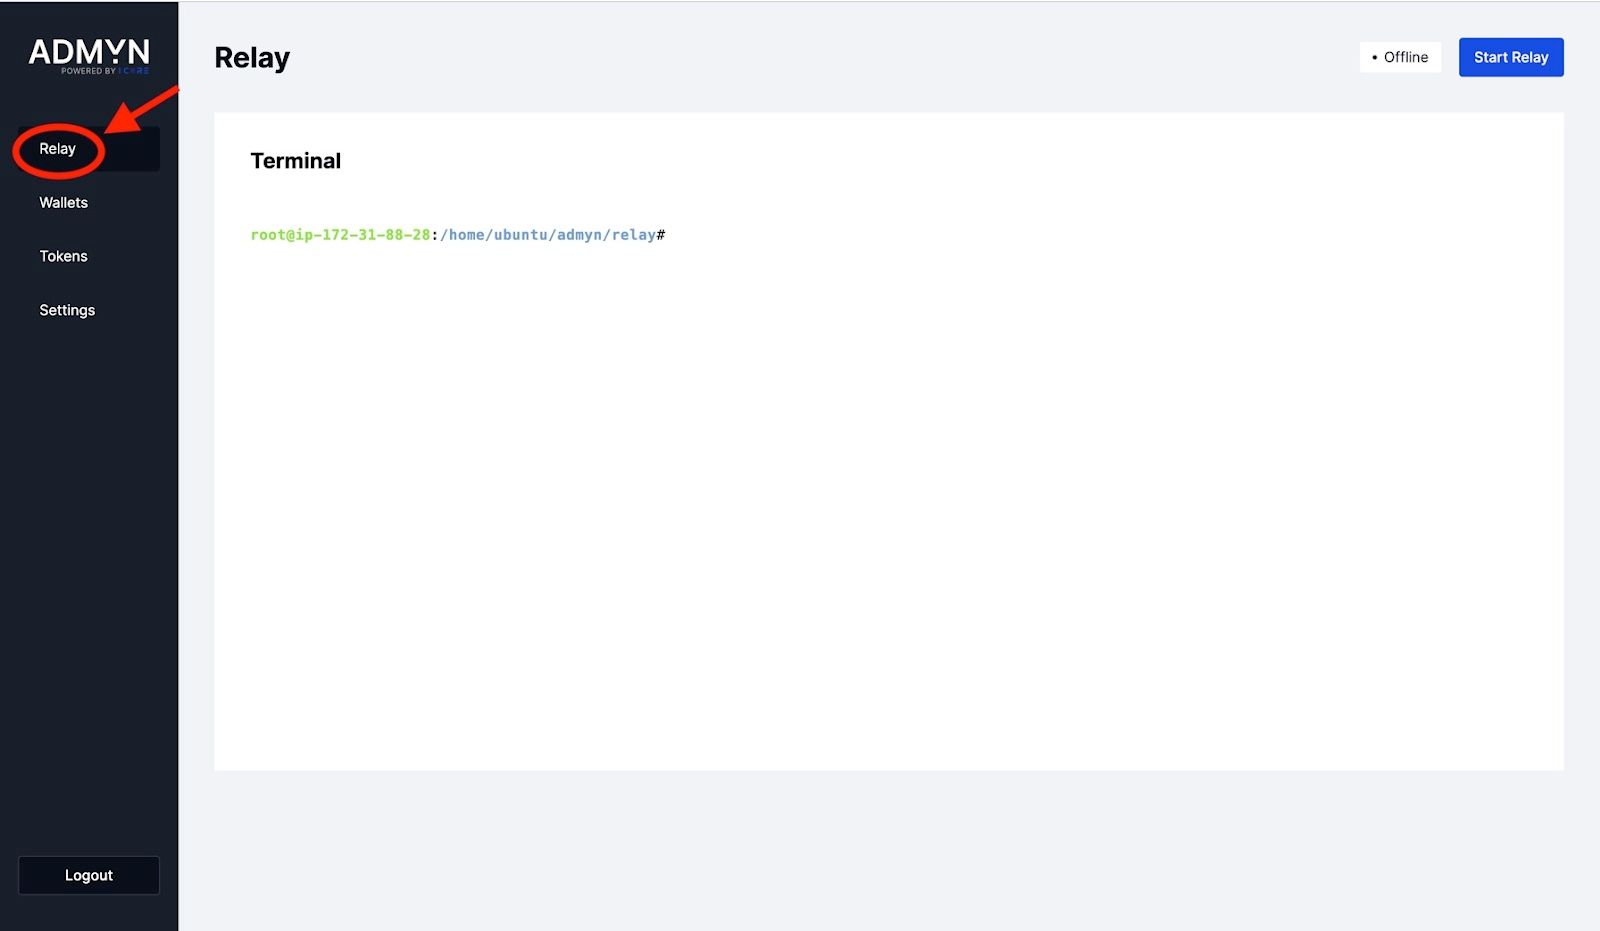
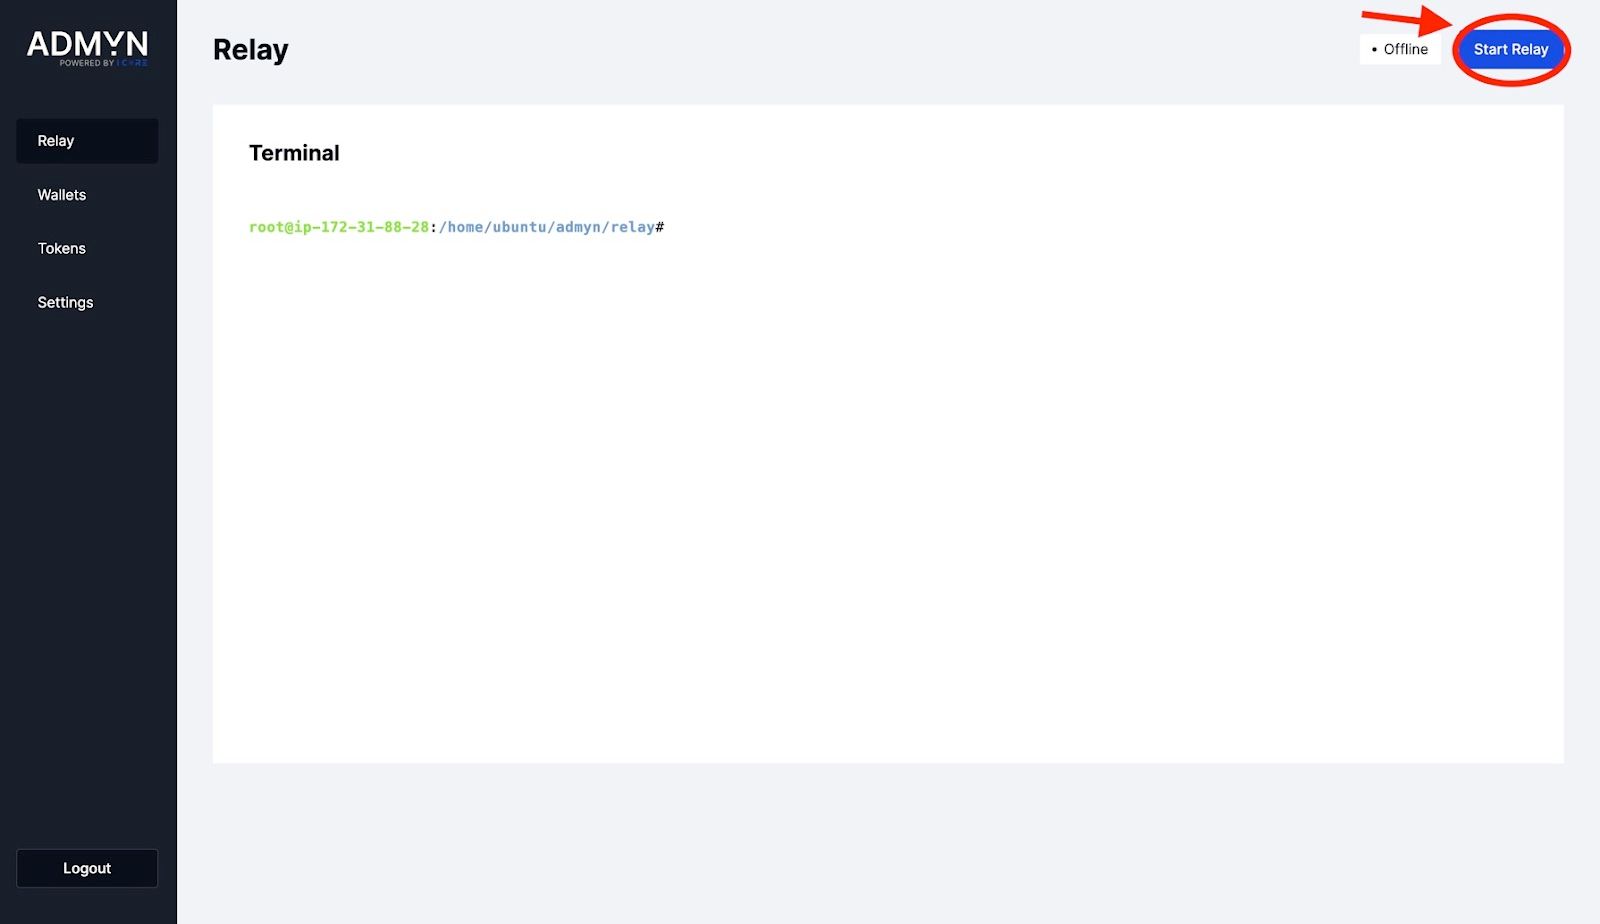
Step 2: Start the Relay
Click "Start Relay" in the top right corner.
Note: While your relay is live, you won't be able to edit wallets or configurations. You can identify the status of your relay on the top right corner of the dashboard.
Congratulations! You have successfully configured and started your relay. You can now proceed with testing your relay.

Creating Your First Token
Follow the steps below to create your first token in the Admyn Panel.
Step 1: Access Token Settings
- Click "Token" on the toolbar located on the left side of the dashboard.
Step 2: Create a Token
- Name your audience as "Test".
- Set the amount to "0". You don't need to worry about the amount type for this token as it will be used for testing purposes.
- Click the "Create Token" button.
Step 3: Update Configuration Settings
- Click "Config" on the toolbar located on the left side of the dashboard.
Step 4: Edit Configuration
- Click "Edit Config" in the top right corner.
Step 5: Enable Tokens
- Set the "Enable Tokens" option to "Required".
Step 6: Save Configuration
- Click "Save Config" in the top right corner.